Amira-Avizo and PerGeos Software License Manager
About the product Licensing Management
The Thermo Fisher Scientific software license you have acquired defines your rights to use the product and some of its modules (extensions) with a specific level of functionality, for a certain version, on designated equipment, and for a specific number of simultaneous users. The license may additionally be restricted to a specific period of time or to specific use cases.
Your Thermo Fisher Scientific software license is protected by a license key. Each time the application is launched, it checks for a valid license key. If a valid license key is found, the application runs. Otherwise, you are requested to get a valid license key.
The product has separate license keys for all editions and extensions.
Node-locked Versus Floating Licenses
There are two main types of licenses: node-locked licenses and floating licenses.
Node-locked licensing allows the software to run on a single, identified computer only.
If you have purchased floating licenses, one or several concurrent users can run sessions at the same time from their computers located on your local network. The number of concurrent users is given by the number of tokens purchased. In this case, you must install FlexNet Publisher license server manager on a local server. Then, on each end user’s computer, you will need to specify the location of this local licensing server (see FNP license server mode).
Time-limited Versus Perpetual Licenses
Licenses can be time-limited or perpetual. Time-limited licenses are valid until a given date, which is shown in the product splash screen at start up or in the About dialog (accessible via the Help  About menu). After this date, the product will stop working. This is usually the case for trial licenses, Beta, or for renewable rented licenses (i.e., yearly subscriptions).
License Manager Actions
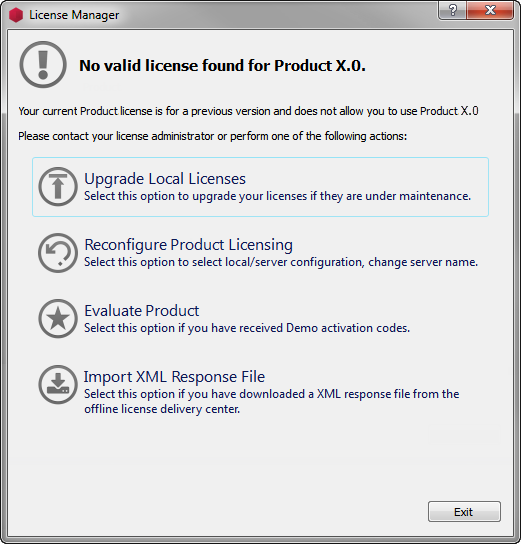
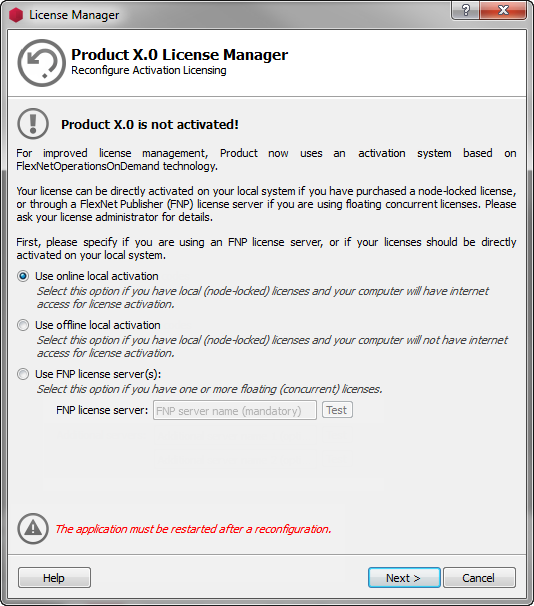
When you launch the product for the first time, a dialog appears, to indicate that no valid license has been found on your computer. You have the choice of activating or evaluating the product (see Figure 2).
Select the Activate option, to open the Activation Wizard. Three modes of configuration (see Figure 3) are available:
- Use online local activation codes: to activate one or several node-locked licenses on a computer with an Internet connection
- Use offline local activation codes: to activate one or several node-locked licenses on a computer with no Internet connection
- Use FNP license server: to specify a license server to activate one or several (editions and/or extensions) licenses
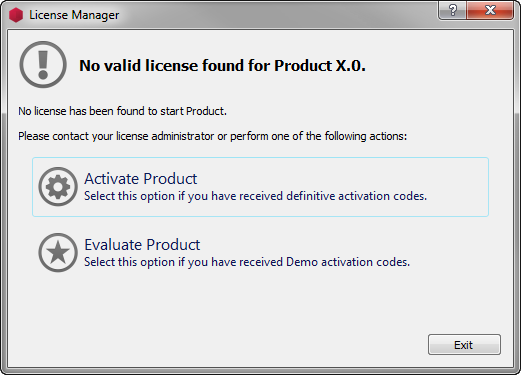
| Figure 2: License Manager – No Valid License Found |
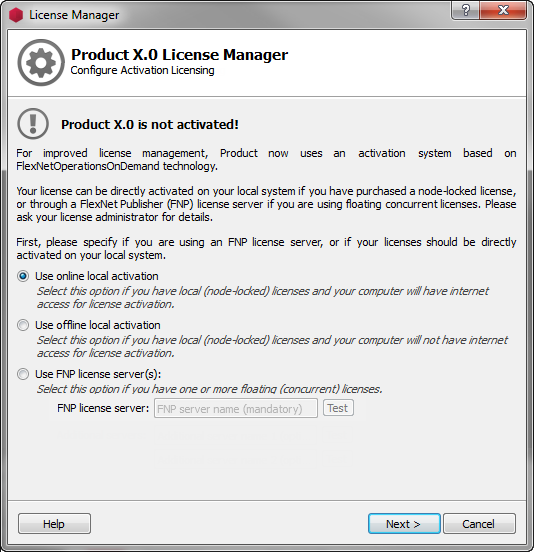
| Figure 3: License Manager – Configuration Wizard |
Note: Other actions may be available depending on the configuration mode.
Online Local Activation Mode
When you work in local activation mode, the product allows you to manage your licenses. Different actions are available depending on the status of your licenses.
Note: An Internet connection is required for all following actions. If you do not have any Internet connection, please refer to the “Offline Local Activation Mode” documentation.
2.1.1 Activate a Node-Locked License
When you purchase one or more product (editions and/or extensions) licenses, you should receive an email from fei@flexnetoperations.com containing a set of activation codes for each purchased product or option.
- Launch the product and select Activate.
- On the first page of the Activation Wizard, select Use local activation codes and click on Next.
- In the Activate Licenses page, simply copy and paste your activation codes into the provided text field and press Activate.
The Activate button is enabled when the activation codes into the provided text field respect this format:
<EntitlementId> [<HostId>] <ProductName>_<ProductVersion> .
HostId is optional.
A connection to the online activation server will start immediately.
When activation is complete, the product is ready to be used and the license manager displays information related to the activation.
An activation code is a string similar to the following:
#License: Product (Product- 1 year time-limited node-locked application license (including maintenance service) – Multiple platforms support) – Expiration date: 12/13/2014:
BL5F-7773-A9F1-F79B Product_X.0
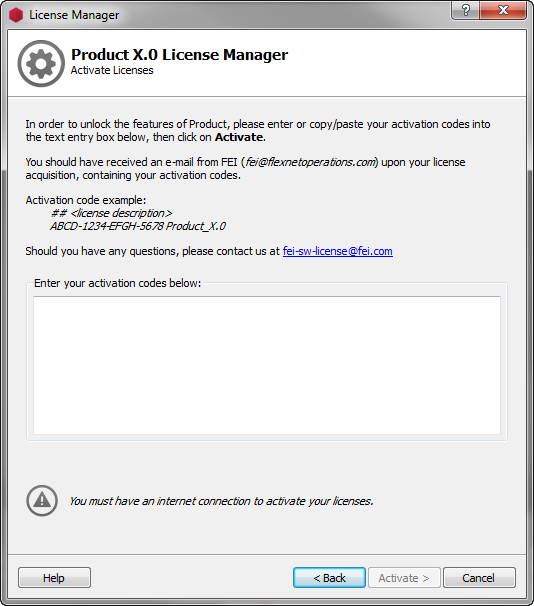
| Figure 4: License Manager – Node-Locked Activation Wizard |
2.1.2 Add New Node-Locked License after Activation
Once the product is activated, you can add other node-locked license to activate new extensions or editions.
To do so:
- Select Help License Manager
- Click on the Activate Additional Extensions or Editions button (see Figure 5)
- The license manager wizard is opened and displays the page Activate Licenses (see Figure 4).
Simply copy and paste your activation codes into the provided text field and press Activate.
The Activate button is enabled when the activation codes into the provided text field respect this format:
<EntitlementId> [<HostId>] <ProductName>_<ProductVersion> .
HostId is optional.
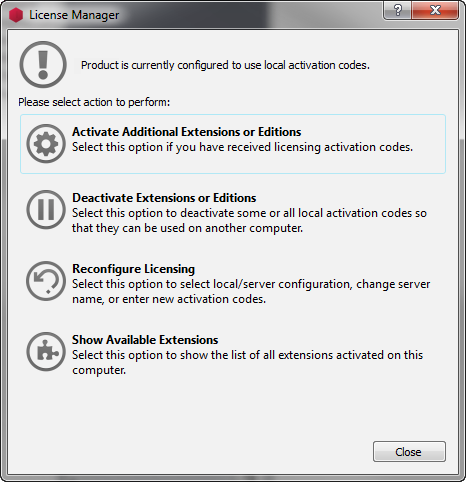
| Figure 5: License Manager Dialog |
2.1.3 Transferring all Node-Locked Licenses to a New Computer
After activating a node-locked license on a computer, you may wish to move it to a new one. To do so, you first need to de-activate the first license by returning the associated activation code and then activate it again on the new computer.
To do so:
- Open the Help License Manager (see Figure 5)
- Click on the Deactivate Extensions or Editions button. A dialog will open (see Figure 17), allowing you to select the licenses you want to deactivate.
- Make sure you have saved your activation codes before deactivating them: click on Copy to clipboard the selected activation codes button and copy the activation codes in a text editor.
- When you click on the Deactivate button (see Figure 6, the selected licenses are returned to the server and can be activated on any other system.
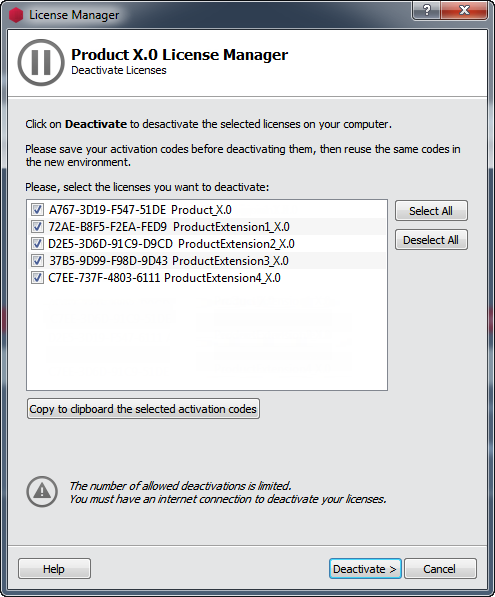
| Figure 6: License Manager – Deactivation Dialog |
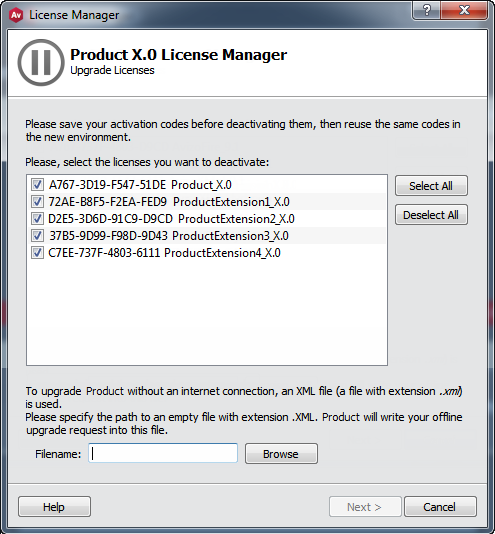
2.1.4 Upgrading to a New Product Version
When a new version of the product is released, a dialog is displayed if the activation process was used for a previous version after installing and launching the new product version.
It offers several choices, including an Upgrade Local Licenses option (see Figure 7).
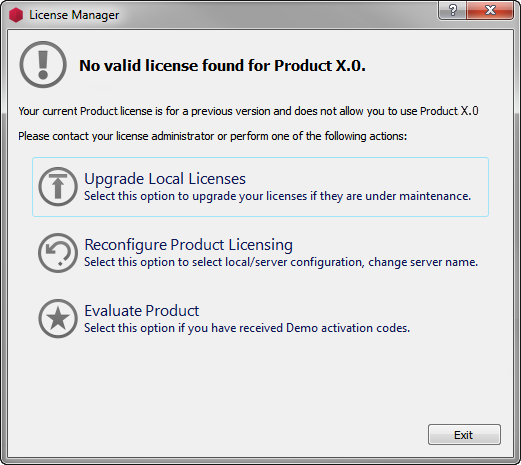
| Figure 7: License Manager – Upgrade Dialog |
If the licensed modules are under maintenance, they will be immediately available for use after the upgrade process.
Note: The previous version can still be used on the same computer even after upgrading to the new version.
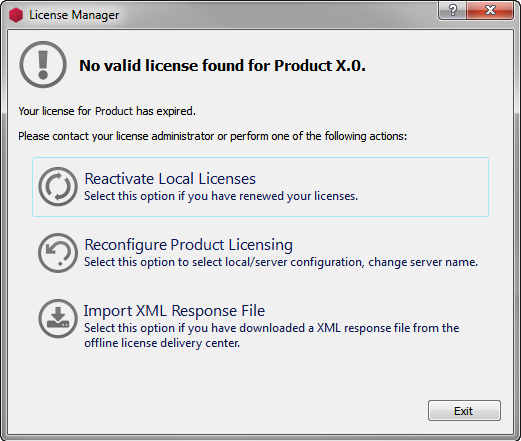
2.1.5 Reactivating a License
When you use a renewable license (i.e., through a subscription agreement), the product will stop working when the license expiration date is reached.
When you launch a new session of the product, an error dialog is displayed with several choices, including a Reactivate option.
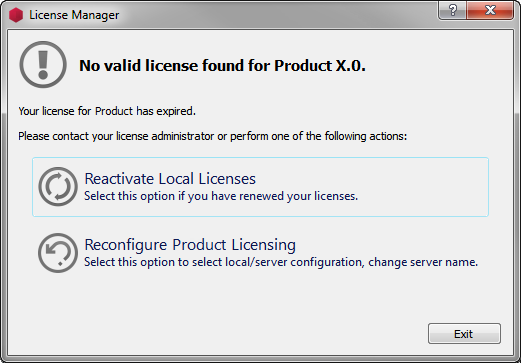
| Figure 8: License Manager – Reactivation Dialog |
As soon as you have renewed your subscription, you can re-activate your node-locked license to allow the product to run again for a new period of time.
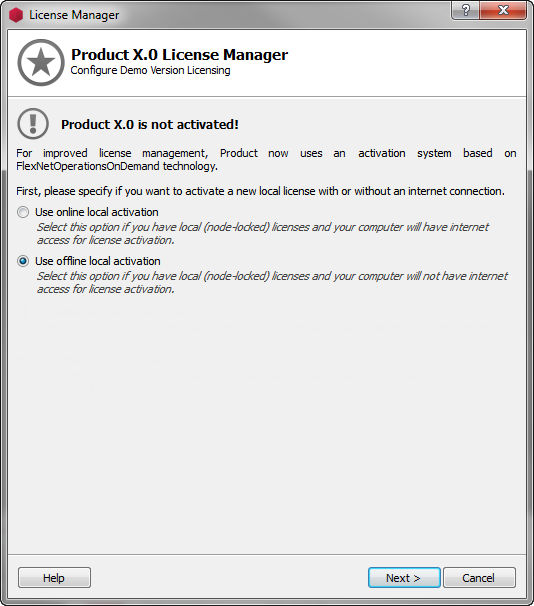
2.1.6 Activate Demo licenses
The Demo licenses are node-locked and time-limited.
- Launch the product and select the Evaluate option.
- On the first page of the Activation Wizard, select Use local activation codes and click on Next.
- On the Activate Demo Licenses page, simply copy and paste your activation codes into the provided text field and press Activate.
The Activate button is enabled when the format of activation code into the provided text field respect this format:
<EntitlementId> [<HostId>] <ProductName>_<ProductVersion> .
HostId is optional.
A connection to the online activation server will start immediately. When activation is complete, the product is ready to be used.
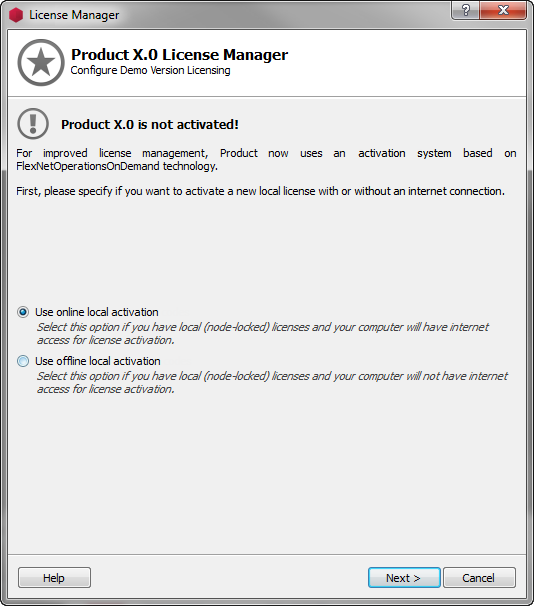
| Figure 9: License Manager – Demo Activation Wizard – Configure Demo Version Licensing |
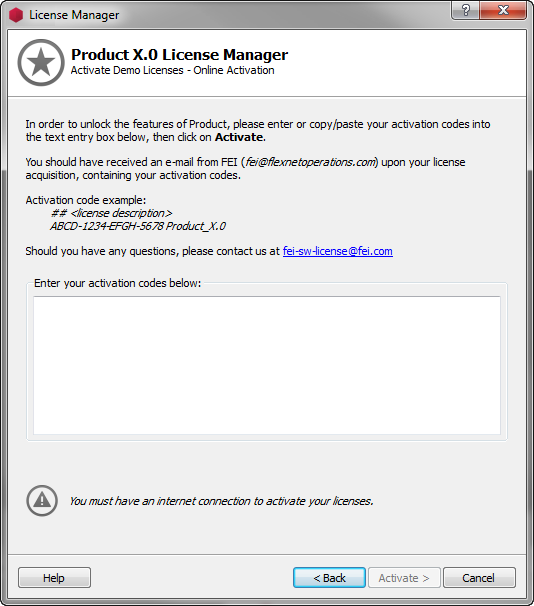
| Figure 10: License Manager – Demo Activation Wizard – Activate Demo Licenses |
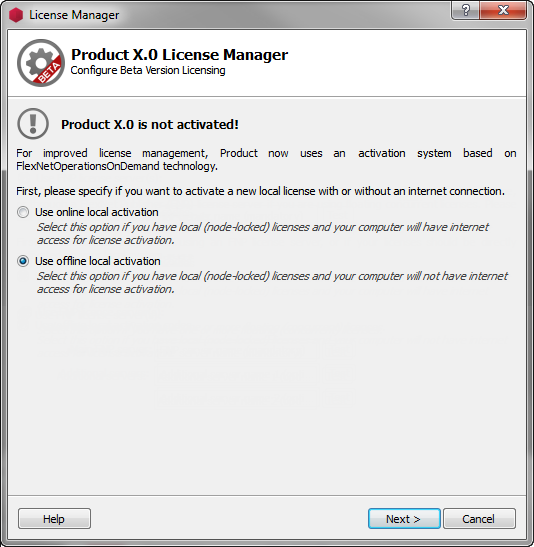
2.1.7 Activate Beta Licenses
The Beta licenses are only node-locked and time-limited.
When you launch a Beta version for the first time, or if your Beta licenses are expired, the Activation Wizard is opened at the Configure Beta Version Licensing page.
- Select Use local activation codes and click on Next
- On the Activate Beta Licenses page, simply copy and paste your activation codes into the provided text field and press Activate
The Activate button is enabled when the format of activation code into the provided text field respect this format:
<EntitlementId> [<HostId>] <ProductName>_<ProductVersion> .
HostId is optional.
A connection to the online activation server will start immediately. When finished, the product is ready to be used.
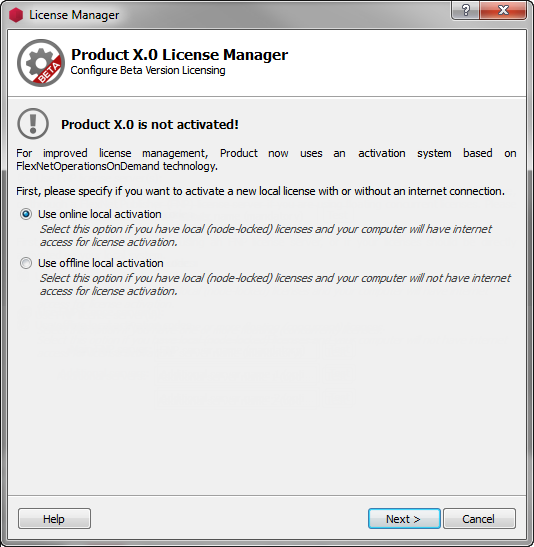
| Figure 11: License Manager – Beta Activation Wizard – Configure Beta Version Licensing |
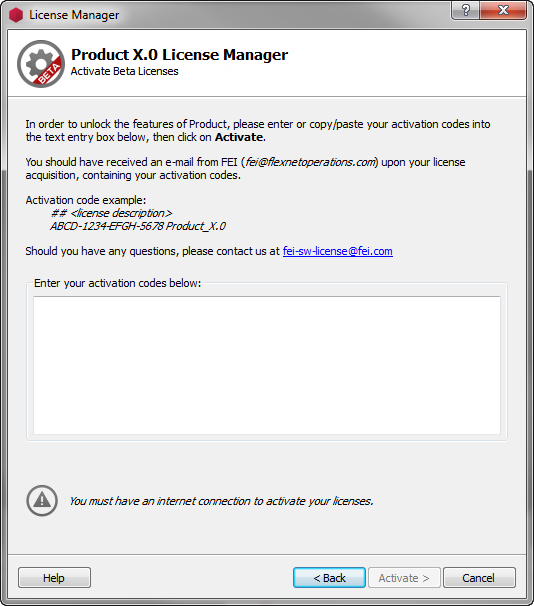
| Figure 12: License Manager – Beta Activation Wizard – Activate Beta Licenses |
Offline Local Activation Mode
In offline activation mode, you will be able to perform the same actions described in “Online Local Activation Mode”, but without any Internet connection.
Note: Access to a computer with an internet connection will be required.
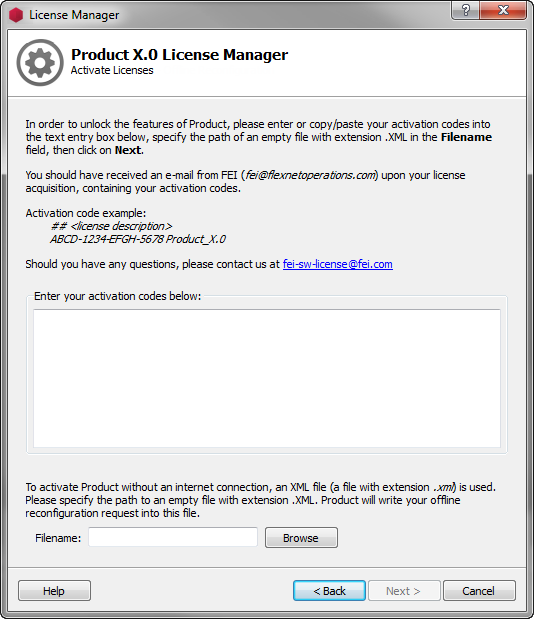
2.2.1 Activate a Node-Locked License
When you purchase one or more licenses (i.e., editions and/or extensions), you should receive an email from fei@flexnetoperations.com containing a set of activation codes for each purchased product or option.
- Launch the product and select Activate.
- On the first page of the Activation Wizard, select Use offline activation codes and click Next.
- In the Activate Licenses page, copy and paste your activation codes into the provided text field and specify a path to an XML file (i.e., a file with extension .xml) that will contain your offline activation request.
- Then, click Next (see Figure 13).
The Next button is enabled when the path of XML request file is specified. The format of activation code uses the following template:
<EntitlementId> [<HostId>] <ProductName>_<ProductVersion> .
HostId is optional.
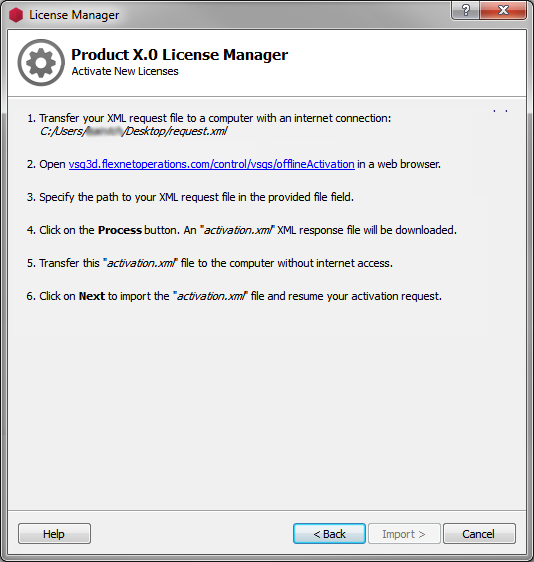
The next page (see Figure 14) explains the remaining steps to perform before completing the offline activation request:
- Transfer your XML request file to a computer with an Internet connection.
- Open vsg3d.flexnetoperations.com/control/vsgs/offlineActivation in a web browser.
- Specify the path to your XML request file in the provided file field.
- Click Process. An activation.xml XML response file will be downloaded.
- Transfer activation.xml to the computer without Internet access.
- Click Next to import the activation.xml file and resume your activation request (see Figure 15).
| Figure 13: License Manager – Offline Activation Wizard |
| Figure 14: License Manager – Offline Instructions |
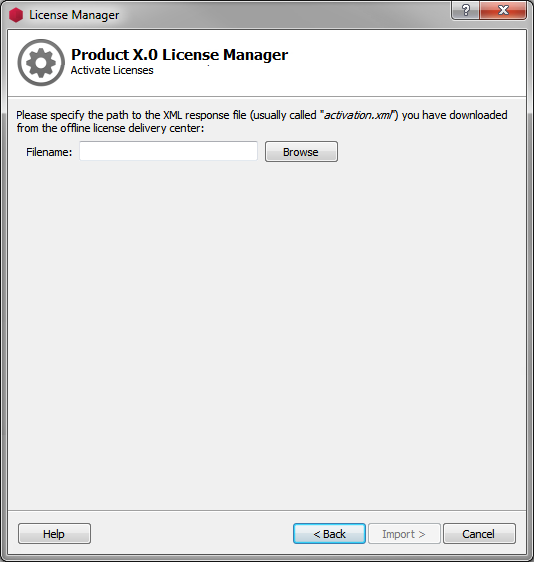
| Figure 15: License Manager – Offline Import |
When activation is complete, the product is ready to be used and the license manager displays information related to the activation.
2.2.2 Add New Node-Locked License After Activation
Once the product is activated, you can add other node-locked license to activate new extensions or editions.
To do so:
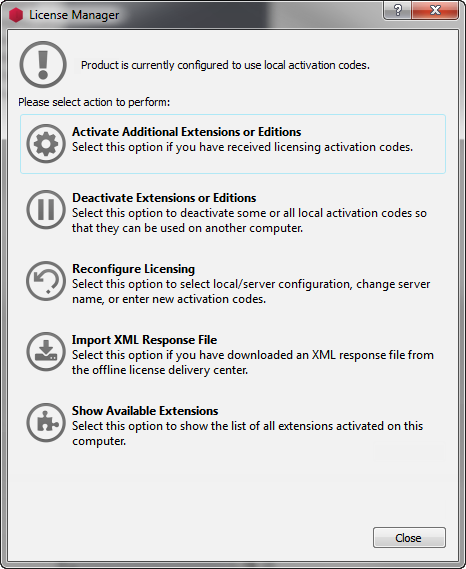
- Select Help License Manager and click Activate Additional Extensions or Editions (see Figure 16).
- The license manager wizard is opened and displays the page Activate Licenses (see Figure 13).
Copy and paste your activation codes into the provided text field and specify a path to an XML file that will contain your offline activation request. - Then click Next and follow the displayed instructions (listed also in the “Offline Local Activation Mode” section).
The Next button is enabled when the path of XML request file is specified. The format of activation code uses the following template:
<EntitlementId> [<HostId>] <ProductName>_<ProductVersion> .
HostId is optional.
| Figure 16: License Manager Dialog Offline |
2.2.3 Transferring all Node-Locked Licenses to a New Computer
After activating a node-locked license on a computer, you may wish to move it to a new one. To do so, you first need to deactivate the first license by returning the associated activation code and then activate it again on the new computer.
To do so:
- Open the Help License Manager (see Figure 16)
- Click Deactivate Extensions or Editions.
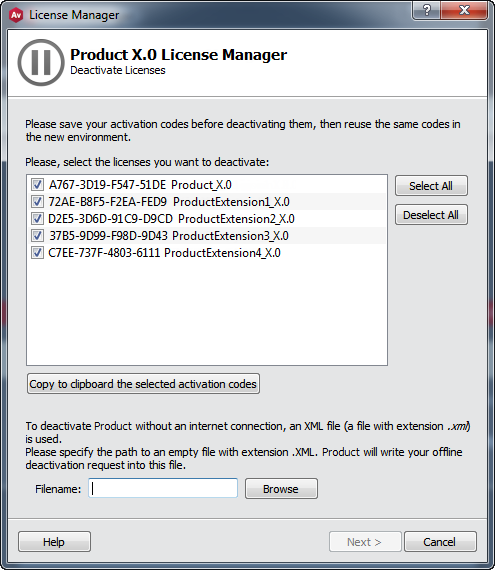
- A dialog will open (see Figure 17): select the licenses you want to deactivate and the path to the XML file that will contain your offline deactivation request.
- Make sure you have saved your activation codes before deactivating them: click on Copy to clipboard the selected activation codes button and copy the activation codes in a text editor.
- After clicking Next, the dialog displaying the offline instructions (listed also in the “Offline Local Activation Mode” section) will be displayed.
- Once the import of the deactivation request has been performed, the selected licenses are returned to the server and can be activated on any other system.
| Figure 17: License Manager – Deactivation Dialog Offline |
2.2.4 Upgrading to a New Version
When a new version of the product is released, a dialog is displayed if the activation process was used for a previous version after installing and launching the new product version.
It offers several choices, including an Upgrade Local Licenses option.
| Figure 18: License Manager – Upgrade Proposal Dialog Offline |
After clicking Upgrade Local Licenses, a dialog will open (see Figure 19), allowing you to select the licenses you want to upgrade and the path to the XML file that will contain your offline upgrade request.
Click Next to display the offline instructions dialog (also listed in the “Offline Local Activation Mode” section).
Once the import of the upgrade request has been performed (and if the licensed modules are under maintenance), the selected licenses will be upgraded and the new version of the product can be used immediately.
| Figure 19: License Manager – Upgrade Licenses Dialog Offline |
Note: The previous version can still be used on the same computer even after upgrading to the new version.
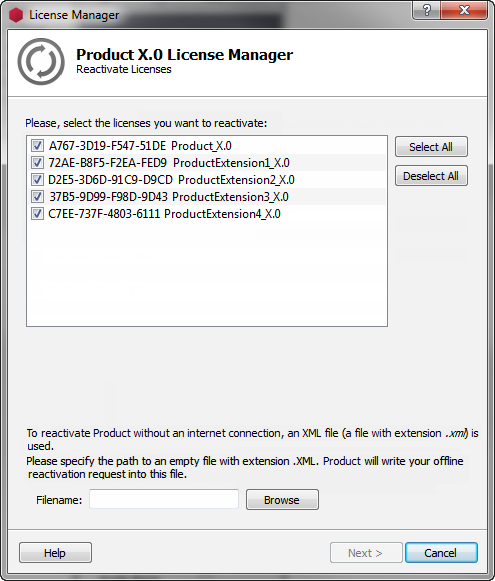
2.2.5 Reactivating a License
When you use a renewable license (i.e., through a subscription agreement), the product will stop working when the license expiration date is reached.
When you launch a new session of the product, an error dialog will appear with several choices including a Reactivate Local Licenses option.
| Figure 20: License Manager – Reactivation Proposal Dialog Offline |
Click Reactivate Local Licenses to open the License Manager dialog box (see Figure 20) and select the licenses you want to activate plus the path to the XML file that will contain your offline reactivation request (see Figure 21).
Click Next to display the offline instructions dialog (also listed in the “Offline Local Activation Mode” section).
Once the import of the reactivation request has been performed (and if you have renewed your subscription), the selected licenses will be reactivated and the new version of the product can be used immediately for a new period of time.
| Figure 21: License Manager – Reactivate Licenses Dialog Offline |
2.2.6 Activate Demo Licenses
The Demo Licenses are node-locked and time-limited.
- Launch the product and select the Evaluate option.
- On the first page of the Activation Wizard, select Use offline activation codes and click Next (see Figure 22).
- On the Activate Demo Licenses page, copy and paste your activation codes into the provided text field and specify a path to an XML file that will contain your offline activation request (see Figure 23).
The Next button is enabled when the path of XML request file is specified. The format of activation code uses the following template:
<EntitlementId> [<HostId>] <ProductName>_<ProductVersion> .
HostId is optional.
- Click Next to display the offline instructions dialog (also listed in the “Offline Local Activation Mode” section).
Once the import of the activation request has been performed, the product is ready to be used.
| Figure 22: License Manager – Demo Activation Wizard – Configure Demo Version Licensing Offline |
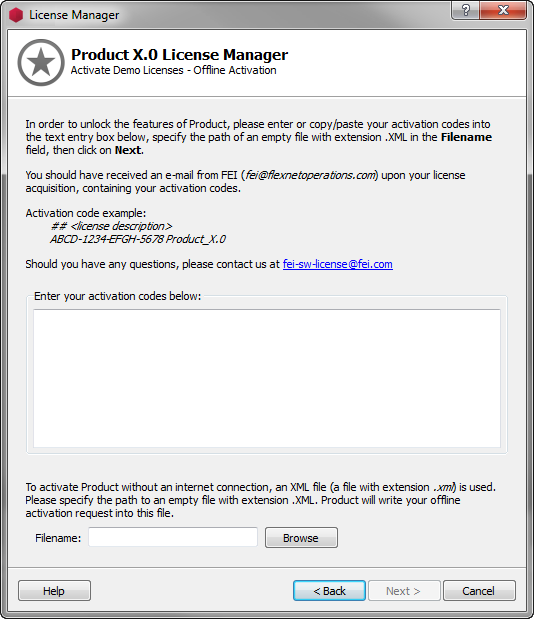
| Figure 23: License Manager – Demo Activation Wizard – Activate Demo Licenses Offline |
2.2.7 Activate Beta Licenses
The Beta licenses are only node-locked and time-limited.
When you launch a Beta version for the first time or if your Beta licenses are expired, the Activation Wizard will open on the Configure Beta Version Licensing page.
- You must select Use offline activation codes and click Next (see Figure 24).
- On the Activate Beta Licenses page, simply copy and paste your activation codes into the provided text field and specify a path to an XML file that will contain your offline activation request (see Figure 25)
The Next button is enabled when the path of XML request file is specified. The format of activation code uses the following template:
<EntitlementId> [<HostId>] <ProductName>_<ProductVersion> .
HostId is optional.
- Click Next to display the offline instructions dialog (also listed in the “Offline Local Activation Mode” section).
Once the import of the activation request has been performed, the product is ready to be used.
| Figure 24: License Manager – Beta Activation Wizard – Configure Beta Version Licensing Offline |

| Figure 25: License Manager – Beta Activation Wizard – Activate Beta Licenses Offline |
FNP License Server Mode
Floating or concurrent licenses are handled by FlexNet Publisher tool. Do the following to manage the product floating licenses:
- Install FlexNet Publisher license server manager on a local server of your LAN
- Activate your product licenses on this license server
- Configure each of the product instance on local computers to use this license server
2.3.1 FNP License Server Manager Installation and Management
Refer to the following website to install a FlexNet license server and manage floating licenses, including activation, upgrade, reactivation, and return:
http://www.fei-software-center.com/flexnet-server-doc/
2.3.2 Configure the product to Use Licenses from FNP License Server
At the product startup, select the Activate option and then Use FNP license server on the first page of the Activation Wizard.
You will need to specify the name of the FNP license server.
Optionally, you can specify a port number with a separator “:” (< ServerName>:< PortNumber>).
Using a specific port number depends on the way the server is configured.
In such a case, please contact your server license administrator for more information about the FNP license server configuration and the potential need to indicate a specific port number.
A connection to the FNP license server will start immediately. When done, the product is ready to be used.
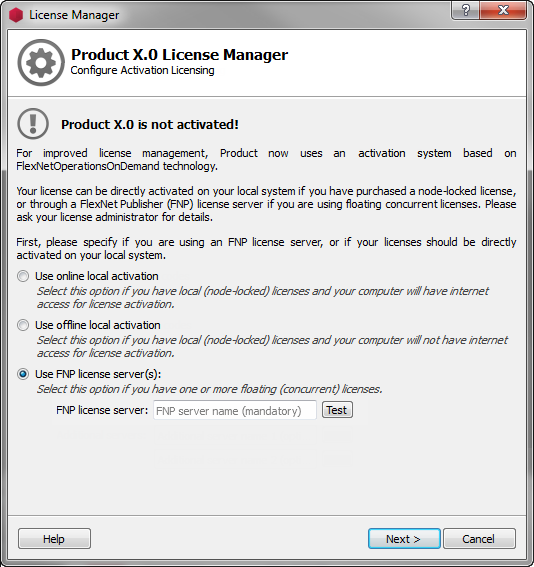
| Figure 26: License Manager – FNP License Server Configuration |
Note: It is possible to test the connection to the specified server using the Test button.
Actions Independent of Activation Mode (Local, Server or Offline)
2.4.1 Reconfigure
You can change your configuration mode at any time, but this action requires that you restart the application.
To do so (in local activation mode), select Help License Manager and click on the Reconfigure Licensing button.
| Figure 27: License Manager – Reconfiguration Wizard |
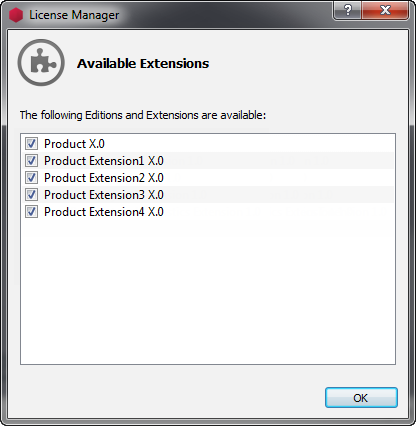
2.4.2 Show Available Extensions
When the product is running, you can see the activated licenses on your computer.
Select Help Show Available Extensions.
| Figure 28: License Manager – Available Extensions |
Note: One activation code can activate several licenses.
Licensing Troubleshooting
Deactivating the product
When using activation codes, please deactivate them before any of the following operations:
- Uninstalling the product
- Reinstalling or replacing the operating system
- Replacing the hard drive
- Disposing of the system
Otherwise, you will not be able to reactivate them on another system since they will still be active on the original system, and it will be difficult or impossible for you to deactivate them for a transfer.
To deactivate the product, please read the following instructions according to your licensing mode: online or offline.
Mixing node-locked and floating licenses
To use node-locked and floating licenses at the same time, you need to:
- Configure the node-locked licenses in local configuration.
- Reconfigure in server configuration and enter the server name.
To do so:
- Select Activate option from the License Manager dialog (see Figure 2),
- Select Use local activation codes (online or offline following your configuration) in the configuration wizard (see Figure 3),
- Click on Next,
- Activate your node-locked licenses following the configuration chose above (online or offline),
- Go back to the configuration wizard (see Figure 3) by clicking on Back twice,
- Select Use FNP license server(s) and enter the server name,
- Click on Next.
In the case where the application is already configured for server licensing and the application can be launched, you need to go in the menu Help License Manager, select Reconfigure and do the steps as indicated above.
Firewall Problem
If you have an Internet connection and encounter the error “Unable to connect to server https” when trying to activate a license, it originates from your firewall configuration.
You need to configure your firewall to allow the connection to the online activation server:
- Server: vsg3d.flexnetoperations.com
- IP: 64.14.29.85
- Port: 443 (https)
Licensing Events Log
If an error occurs during the product activation, you can find more details in the licensing events log.
However, most likely you will need to send it to the technical support team for analysis (Help Online Support menu).
The log file is saved in the user application data directory:
- Windows path: C:\Users\<your_login_name>\AppData\Roaming\Thermo Fisher Scientific\licensing<ProductName>.log
- Linux and Mac OS X path: /home/<your_login_name>/.config/Thermo Fisher Scientific/licensing<ProductName>.log
This log file details all activation actions and licensing information only when an error occurs.
License Lookup Log
If the VSG_LICENSE_DEBUG environment variable is set to a file name, licensing debug output is written to the specified file when the product is launched. You can open and read this debug file yourself.
However, most likely you will need to send it to the technical support team for analysis (Help Online Support menu).
Below are instructions for setting this environment variable on Windows and on Linux and Mac OS X systems.
Note: For using a license debug filename as indicated below, you need sufficient privileges to write into the the product installation directory.
Otherwise, set VSG_LICENSE_DEBUG to a path where you can write files. For example, /home/<your_login_name>/debug.txt, or C:\Temp\debug.txt.
You can set the environment variable via the Control Panel for Windows or you can set it in a command prompt on all platforms.
3.5.1 Windows – Control Panel
- Go to the Control Panel via the Windows Start menu.
- In the Control Panel, select the System application.
- Click the Advanced tab.
- Click the Environment variables button.
- In either the User or System variables, click New.
- For the Variable name, enter VSG_LICENSE_DEBUG.
- For the Variable value, enter debug.txt (without the quotes).
- Click OK to close the dialog boxes
- Run the product from the Start menu. When the License Manager dialog is displayed, dismiss it.
- Then look for a file named debug.txt in the top level of the the product installation directory. Send the file to tech support for analysis.
3.5.2 Windows – Command Prompt
- On Windows you can get to a command prompt via the Windows Start menu as follows:
Start Programs Accessories Command Prompt - In the command prompt window, type:
set VSG_LICENSE_DEBUG=debug.txt - Change the current directory to where your the product executable is. For example:
cd C:\Program Files\<ProductName>2019\bin\arch-Win64VC12-Optimize - Run the product as follows:
<ProductName>.exe - When the License Manager dialog displays, dismiss it.
- Look for the file debug.txt in the current directory. Send the file to tech support for analysis.
3.5.3 Linux and Mac OS X – Terminal
- On Linux and Mac OS X systems, the exact command to use for setting environment variables depends on the kind of shell you are using.
Here are examples for a few commonly used shells.
Bash shell:
export VSG_LICENSE_DEBUG=debug.txt
C shell:
setenv VSG_LICENSE_DEBUG debug.txt - In the window in which you set the environment variable, change to the the product installation directory. For example:
cd /opt/<ProductName>2019 - Run the product as follows:
bin/start - When the License Manager dialog is displayed, dismiss it.
- Look for the file debug.txt in the current directory. Send the file to tech support for analysis.
Return or Upgrade Impossible with Node-Locked Licenses
The License Manager uses the Unique Machine Number (UMN) to validate the identity of the machine that initiated the request.
The Unique Machine Number value is retrieved from your system hardware information, or from hypervisor-controlled information for virtual machines.
If your system hardware is modified since the original activation, the UMN of your machine can be changed and the License Manager will consider your machine to be a different machine.
Consequently, the following error message may appear:
“Trying to return a fulfillment issued to a different machine.”
If this error message occurs, contact Technical Support for assistance.
Contacting the License Administrator
You can contact the license administrator using this address: customer support portal