Installing, Configuring, and Administrating a FlexNet License Server
for Thermo Scientific Software Applications
1 Overview
Thermo Scientific software products Avizo, Amira and PerGeos (referred to below as “Thermo Scientific Software”) use the FlexNet licensing tool for supporting floating licenses.
In this scenario, you have purchased a specific number, N, of product licenses.
The FlexNet license server tracks the licenses being used and allows simultaneous use of up to N instances of the software.
The advantage of this approach is that, unlike node-locked licensing, the product is not locked to a specific computer, but can be run on any computer that can communicate with the license server.
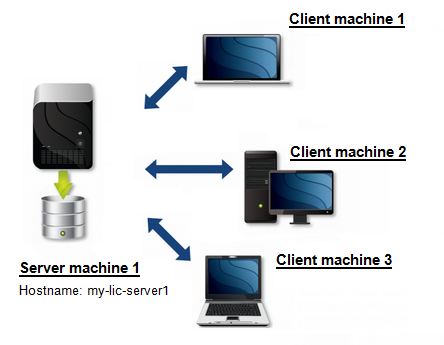
| Figure 1: FlexNet license server architecture example |
Warning: Installation and management of floating licenses is not a trivial undertaking. It can require configuration of firewalls and an in-depth knowledge of the network configuration at your site.
Ideally you will have access to a knowledgeable, resourceful, and experienced IT group to provide the necessary support.
2 Configure your Thermo Scientific Software Client Applications to Use a FlexNet License Server
When configuring your Thermo Scientific Software licensing mode, you must choose “Use FNP licensing server” and specify the name of the server (here “my-lic-server1”). The name can be specified using the host name or the IP address.
Please refer to the License Manager section of the Thermo Scientific Software documentation.
3 Install a FlexNet License Server
The first thing to do is decide on which computer you wish to run the FlexNet license server. This system should be “visible” from any system that might want to request a license. It should also be highly reliable.
The server can be installed on a computer on which the Thermo Scientific Software is installed, but it does not have to be.
It is possible to do FlexNet licensing in a heterogeneous environment. That is, the server and the Thermo Scientific Software can be running on different operating systems. For instance, the FlexNet server could be on a Linux box, with the users running the Thermo Scientific Software on a Windows platform.
If your site already has a FlexNet license server running that is used for licensing other vendors’ products, this may affect where and how you decide to configure the Thermo Scientific Software license server.
For more information, please refer to FlexNet Publisher – License Administration Guide chapter 18 “Managing Licenses from Multiple Software Publishers“.
There are two versions of the license server manager:
- lmadmin—The web-based license server manager
- lmgrd—The original license server manager with a command-line interface.
You can use lmgrd to manage your FlexNet license server but it uses older technology, and may become deprecated.
Here is the link to the FAQ section where you can find the documentation on “How to use lmgrd as an alternative of lmadmin”.
lmadmin provides improved methods of managing the license server and vendor daemons.
For complete technical details, please refer to FlexNet Publisher – License Administration Guide chapter 9, section “lmadmin License Server Manager“.
Warning: To install a FlexNet license server, administrator rights are required.
3.1 System Requirements
The supported platforms for installing a FlexNet license server and using the Thermo Scientific FlexNet tools for license administration are the following:
- Microsoft Windows (32-bit and 64-bit)
- Windows 7, 8, 8.1, 10, Windows Server 2008 R2, Windows Server 2012 R2
- Fully tested on Windows 10 (64-bit)
- Linux x86-64 (64-bit).
- Red Hat Enterprise Linux 6 and 7
- SUSE Linux Enterprise 10, 11, and 12
- Fully tested on Red Hat Enterprise Linux 7 (64-bit)
- Mac OS X (32-bit and 64-bit):
- Mac OS X 10.7, 10.8, 10.9, 10.10 and 10.11.
- Fully tested on Mac OS X 10.11 (64-bit)
3.1.1 Additional System Requirements for lmadmin
For lmadmin Linux installation, please note these additional requirements:
- Linux 32-bit libraries, required by lmadmin, are not automatically installed with Red Hat Enterprise Linux 6 (64-bit). You must manually install these libraries on this operating system. Refer to the Red Hat Enterprise Linux documentation for details.
3.1.2 Supported Browsers for lmadmin
lmadmin is supported on the following web browsers:
- On Red Hat Linux: Mozilla Firefox 10, 12 and 18.x, Google Chrome 24.x
- On Windows: Microsoft Internet Explorer 11
- On Apple OS X: Apple Safari 5.0 and 5.1.7
3.2 Download License Server Installer
To use Thermo Scientific Software, you must have installed version 11.14.0 or higher of the FlexNet tools on your system. You can download these tools via the following links.
If you have already installed a license server with a previous version of the FlexNet tools, please refer to section 6. Upgrading the FlexNet license server of this document to upgrade your FlexNet license server.
Windows:
- FlexNet tools 11.14.0.0 for Microsoft Windows 32-bit
- FlexNet tools 11.14.0.0 for Microsoft Windows 64-bit
Linux:
Mac OS X:
3.3 Activate Thermo Scientific Software Licenses
3.3.1 Prerequisites
-
-
- Extract the downloaded package.
- Install FlexNet Publisher license service. Note: this action requires administrator rights.
- Open a command prompt/terminal in the directory where you have extracted the FlexNet server tools archive and go to the FlexNetLicenseServerTools subdirectory.
- Enter the following command:
- For Windows: installanchorservice mcslmd mcslmd-applications
- For Linux and Mac OS X: sh install_fnp.sh
- Add the current directory to your library path by entering the following command (Linux/Mac OS X only) where <PathToFlexNetLicenseServerToolsDirectory> must be replaced by the explicit path to the FlexNetLicenseServerTools directory:
- Linux bash: export LD_LIBRARY_PATH=<PathToFlexNetLicenseServerToolsDirectory>:$LD_LIBRARY_PATH
- Linux csh: setenv LD_LIBRARY_PATH <PathToFlexNetLicenseServerToolsDirectory>:$LD_LIBRARY_PATH
- Mac OS X bash: export DYLD_LIBRARY_PATH=<PathToFlexNetLicenseServerToolsDirectory>:$DYLD_LIBRARY_PATH
- Mac OS X csh: setenv DYLD_LIBRARY_PATH <PathToFlexNetLicenseServerToolsDirectory>:$DYLD_LIBRARY_PATH
- For Windows, install Visual C++ 2013 Redistributable Package, otherwise the message “The program can’t start because MSVCR120.dll is missing from your computer” will be displayed when executing the ServerFNOODActivation tool. If you already have it installed on your system, you may see an error message indicating that a newer version of Microsoft Visual C++ Redistributable has been detected on the machine. You can ignore this error message and continue to the next step.
- Windows 32-bit (click on Download then select vcredist_x86.exe )
- Windows 64-bit (click on Download then select vcredist_x64.exe )
- Under Linux/Mac OS X, please check that the folder /usr/local has write permission for activating, deactivating and upgrading licenses.
-
3.3.2 Activate Licenses
The licenses must be activated using the same account as the user actually running the license server (lmadmin or lmgrd).
Please note that tokens (AvizoSubscription licenses) cannot be installed on the same server machine as regular Amira/Avizo floating licenses.
3.3.2.1 Online Activation
This section describes how to install activation codes on a server with an internet connection.
-
-
- Open a command prompt/terminal in the directory where you have extracted the FlexNet server tools archive and go to the FlexNetLicenseServerTools subdirectory and use it for all the following steps.
- Copy/paste the activation code lines and press Enter.
Activation code lines look like:
ServerFNOODActivation -a A1A2-B2D6-0CD4-044B Avizo_2019.1 5
ServerFNOODActivation -a A3D2-B2D6-0CD4-044B AvizoXFiber_2019.1 3 - After a few minutes, your licenses will be activated.
-
If you encounter the error “Unable to connect to server https” when trying to activate a license, it is probably due to your firewall configuration.
3.3.2.2 Offline Activation
This section describes how to install activation codes on a server without internet connection.
Note: Access to a computer with an internet connection will be required.
Generating the request XML file
-
-
- Open a command prompt/terminal in the directory where you have extracted the FlexNet server tools archive and go to the FlexNetLicenseServerTools subdirectory and use it for all the following steps.
- Run ServerFNOODActivation -a <ActivationCode> <Quantity> -offline <File.xml> (words between <> characters must be updated according to your own data).
For example, if your activation code is ABCD-EFGH-IJKL-MNOP Avizo_2019.1, the number of licenses is 5, and you want to save the request in a file request.xml, enter:
ServerFNOODActivation -a ABCD-EFGH-IJKL-MNOP Avizo_2019.1 5 -offline request.xml
If you have received several activation codes, you can request several activations in the same file:
ServerFNOODActivation -a <ActivationCode1> <Quantity1> -a <ActivationCode2> <Quantity2> -a <ActivationCode3> <Quantity3> -offline <File.xml>
-
Generating and importing the response XML file
-
-
- Transfer your XML request file to a computer with an internet connection.
- Open https://vsg3d.flexnetoperations.com/control/vsgs/offlineActivation in a web browser.
- Specify the path to your XML request file in the provided file field.
- Click on the Process button. An “activation.xml” XML response file will be downloaded.
- Transfer this “activation.xml” file to the FNP license server.
- Back in the command prompt/terminal, enter:
ServerFNOODActivation -response <ResponseXMLPath>/activation.xml (where <ResponseXMLPath> corresponds to the directory where you have transferred the “activation.xml” XML response file) - After a few seconds, your licenses will be activated.
-
3.4 Install lmadmin as License server manager
Warning: To install lmadmin, the administrators rights are required.
Note: Installing lmadmin will temporarily stop the current FlexNet Publisher service (if already started).
Installation on Windows
- Go to the directory where you have extracted the FlexNet server tools archive and run lmadmin installer: flexnet-server_11.14.0.0_windows-x64-msvc11u4/FlexNetLmadminInstaller/lmadmin-i86_n3-11_14_0_0.exe
- Keep the default install directory: C:\Program Files (x86)\FlexNet Publisher License Server Manager (for Windows 10 change the default directory which is not writable).
- Perform all the first steps with default values until the Important information page where you must check Install Visual C++ 2008 Redistributable Package.
- If you already have it installed on your system, you may see an error message indicating that a newer version of Microsoft Visual C++ Redistributable has been detected on the machine. You can ignore this error message and continue to the next step.
- Continue until the Service Configuration page where you must check the box Run as a service. Perform all remaining steps with default values.
- Check that the server has started:
- Open Windows Task Manager and look for the service lmadmin in the Services tab. If the service is stopped, start it.
- Open http://localhost:8090/ in a web browser. The dashboard of the license server should be displayed.
Installation on Linux
Warning: To install lmadmin, you must run the following steps as a non-root user with root privileges (do not use root user).
- Open a Terminal window.
- Install lmadmin from directory FlexNetLmadminInstaller where you have extracted the FlexNet server tools archive:
- Run the command sudo ./flexnet-server_11.14.0.0_linux-x64-gcc44/FlexNetLmadminInstaller/lmadmin-i86_lsb-11_14_0_0.bin
- If you get an error message about missing libraries, please refer to Additional System Requirements for lmadmin
- By default, the lmadmin install directory is: /opt/FNPLicenseServerManager
- Perform all steps with default values and finish.
- Launch the command: sudo chown -R <YourUserName> /opt/FNPLicenseServerManager
- Add the current directory to your library path by entering the following command:
- Linux bash: export LD_LIBRARY_PATH=/opt/FNPLicenseServerManager/:$LD_LIBRARY_PATH
- Linux csh: setenv LD_LIBRARY_PATH /opt/FNPLicenseServerManager/:$LD_LIBRARY_PATH
- Start the server with the command: /opt/FNPLicenseServerManager/lmadmin
- Check that the server has started:
- Open http://localhost:8090/ in a web browser.
- The process lmamin should be displayed by the command: ps -fC lmadmin.
Installation on Mac OS X
Warning: To install lmadmin, you must run the following steps as a user with administrator rights (do not use root user).
- Open a Terminal window.
- Install lmadmin, from directory FlexNetLmadminInstaller where you have extracted the FlexNet server tools archive: ./flexnet-server_11.14.0.0_osx-x64-clang60/FlexNetLmadminInstaller/FlexNet_Publisher_License_Server_11_14_0_0.app/Contents/MacOS/FlexNet_Publisher_License_Server_11_14_0_0
- Select /Applications/FNPLicenseServerManager as install directory.
- Perform all steps with default values and finish.
- Copy script service for lmadmin: sudo cp ./flexnet-server_11.14.0.0_osx-x64-clang60/FlexNetLmadminService/* /Library/StartupItems/
- If the install directory is not /Applications/FNPLicenseServerManager, the script LMadmin should be updated with the command: sed -i -e "s;/Applications/FNPLicenseServerManager;<your install directory>;g" /Library/StartupItems/LMadmin
- Check that the logs directory for FNPLicenseManager exists:
- Run this command to display logs directory contents: ls -l /Applications/FNPLicenseServerManager/logs
- If the logs directory doesn’t exist, create it: mkdir /Applications/FNPLicenseServerManager/logs
- Start the server with the command: /Library/StartupItems/LMadmin start
- Check that the server has started:
- Open http://localhost:8090/ in a web browser.
- Open Activity Monitor and check that the process lmadmin is running.
Note: For more information on lmadmin, please refer to FlexNet Publisher – License Administration Guide chapter 9, section “lmadmin License Server Manager“.
3.5 Adding the mcslmd Vendor Daemon to lmadmin
-
- Make sure that process mcslmd is not running. If necessary, please stop it. To check it:
- For Windows:
- Open the Windows Task Manager and look in the Services and Processes tabs.
- Stop mcslmd. Right click on mcslmd and stop it.
- For Linux:
- Open a Terminal, and run: ps -fC mcslmd
- If mcslmd is displayed: pkill mcslmd
- For Mac OS X:
- Open Activity Monitor
- Stop mcslmd process.
- For Windows:
- Copy/paste the mcslmd and mcslmd_libFNP files from the downloaded package FlexNetLicenseServerTools directory to the lmadmin install directory. By default, the lmadmin install directory is:
- C:\Program Files (x86)\FlexNet Publisher License Server Manager on Windows.
- /opt/FNPLicenseServerManager on Linux.
- /Applications/FNPLicenseServerManager on Mac OS X.
- If you have just installed lmadmin, please check that the lmadmin service is running:
- For Windows, open the Windows Task Manager and select the Services tab.
- If lmadmin is not running, run lmadmin.exe (by default C:\Program Files (x86)\FlexNet Publisher License Server Manager)
- For Linux open a Terminal, and run: ps -fC lmadmin
- If lmadmin is not running, start it using the command: /opt/FNPLicenseServerManager/lmadmin
- For Mac OS X, open Activity Monitor
- If lmadmin is not running, open a terminal and start it using the command: /Library/StartupItems/LMadmin start
- If lmadmin is not running, open a terminal and start it using the command: /Library/StartupItems/LMadmin start
- If lmadmin is not running, please refer to section 3.4 Install lmadmin as license server manager.
- For Windows, open the Windows Task Manager and select the Services tab.
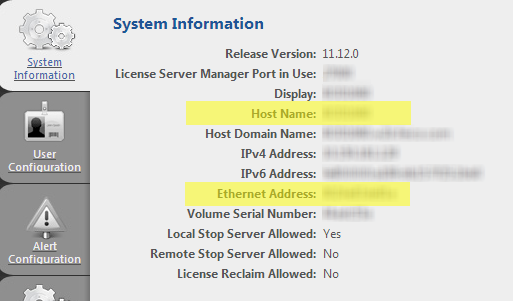
- Open http://localhost:8090/systeminfo in a web browser.
- If you have just installed lmadmin, you will be prompted to enter a name and a password: enter “admin” and “admin”.
- Retrieve and copy the Host Name and the Ethernet Address. If Ethernet Address is not displayed, you can use the Volume Serial Number.
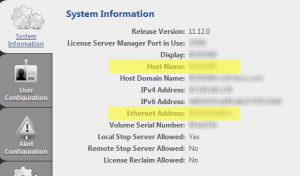
Figure 2:
lmadmin – Retrieve and copy the Host Name and the Ethernet Address.
- Create a temporary text-only file (at any location) named license.dat containing:
SERVER <HostName> <EthernetAddress>
VENDOR mcslmd
For instance:
SERVER my-lic-server1 012345678901
VENDOR mcslmd - Open http://localhost:8090/vendor in a web browser, to set up your license server as follows:
- Click on Import License.
- Select your previously created license.dat file.
- Check Overwrite License File on License Server.
- Click on Import License.
- Check that mcslmd vendor has started:
- on http://localhost:8090/vendor web page mcslmd status is Up.
- If mcslmd fails to start, please refer to FAQ – mcslmd Vendor Daemon Startup Troubleshooting Suggestions.
- Make sure that process mcslmd is not running. If necessary, please stop it. To check it:
Congratulations! The server is now launched and the Thermo Scientific Software activated licenses are ready to be used by client applications.
To view all available licenses, open http://localhost:8090/dashboard in a web browser and select Concurrent.
Note: If you encounter any issue with your configuration, please check that lmadmin and mcslmd are allowed to communicate through the firewall.
4 Administrating your Licenses
Warning: To be able to perform the following steps, be sure to have downloaded the latest version of the FlexNet server tools (see section 3.2 Download license server installer)
On Linux/Mac OS X, add the FlexNet license server tools directory (named FlexNetLicenseServerTools) to your library path before calling the ServerFNOODActivation FlexNet executable tool.
To do so, follow the procedure described in the Activate Thermo Scientific Software licenses section.
Check also that the folder /usr/local has write permission for activating, deactivating and upgrading licenses.
4.1 Checking the Status of your Licenses
At any time, you can check the status of your licenses calling the ServerFNOODActivation tool with the -v option (see figure 2).
4.2 Adding New Licenses
You will receive activation codes by email.
In order to activate them:
-
-
- Open a command prompt/terminal in the directory where you have extracted the FlexNet server tools archive and go to the FlexNetLicenseServerTools subdirectory.
- Your server is connected to the internet:
- Copy/paste the activation code lines and press Enter. Activation code lines look like:
ServerFNOODActivation -a A1A2-B2D6-0CD4-044B Avizo_2019.1 5
If you have several activation codes, you can request several activations at the same time:
ServerFNOODActivation -a <ActivationCode1> -a <ActivationCode2> -a <ActivationCode3>
Your server is not connected to the internet:
- Follow the same procedure as the one described in the 3.3.2.2 Activate licenses > Offline activation section
- Copy/paste the activation code lines and press Enter. Activation code lines look like:
- Open http://localhost:8090/vendor in a web browser.
- Click on the mcslmd line.
- Click on Reread License Files.
-
4.3 Upgrading your Licenses
When a new version of an Thermo Scientific Software application is released, you will need to upgrade your activated licenses on the FlexNet license server in order to allow client application users to run this new release.
Example: You have initially activated Amira 6.7 licenses, and have received the Amira 2019.1 upgrade.
Before installing the Amira 2019.1 version on each client system, perform the following operation on the server system:
-
-
- Open a command prompt/terminal in the directory where you have extracted the FlexNet server tools archive and go to the FlexNetLicenseServerTools subdirectory.
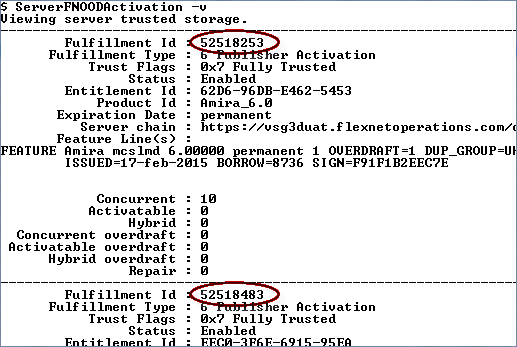
- Run ServerFNOODActivation -v to display the licenses currently installed on your machine.
- Copy all fulfillment IDs.

Figure 2:
Copy all fulfillment IDs from ServerFNOODActivation -v - Your server is connected to the internet:
- Run ServerFNOODActivation -u <FulfillmentID> <VersionToUpgradeTo> for every fulfillment ID.
<VersionToUpgradeTo> contains only major and minor numbers (E.g., 2019.1 not 2019.1.1).
For example, when upgrading from Amira 6.7 to Amira 2019.1:
ServerFNOODActivation -u 52518253 2019.1
You can request several upgrades at the same time:
ServerFNOODActivation -u <FulfillmentID1> <VersionToUpgradeTo> -u <FulfillmentID2> <VersionToUpgradeTo> -u <FulfillmentID3> <VersionToUpgradeTo>
Your server is not connected to the internet:
- Run ServerFNOODActivation -u <FulfillmentID> <VersionToUpgradeTo> -offline <File.xml>.
<VersionToUpgradeTo> contains only major and minor numbers (E.g., 2019.1 not 2019.1.1).
For example, when upgrading from Amira 6.7 to Amira 2019.1:
ServerFNOODActivation -u 52518253 2019.1 -offline request.xml
If you have several activation codes, you can request several upgrades in the same file:
ServerFNOODActivation -u <FulfillmentID1> <VersionToUpgradeTo> -u <FulfillmentID2> <VersionToUpgradeTo> -u <FulfillmentID3> <VersionToUpgradeTo> -offline <File.xml> - Follow the Generating and importing the response XML file procedure (in section 3.3.2.2).
- Run ServerFNOODActivation -u <FulfillmentID> <VersionToUpgradeTo> for every fulfillment ID.
- Open http://localhost:8090/vendor in a web browser.
- Click on the mcslmd line.
- Click on Reread License Files.
-
Note: All of your Thermo Scientific Software licenses under valid maintenance service will be upgraded to the requested version if available. Please contact the Thermo Scientific Software Group licensing service for more information.
4.4 Reactivating your Renewable Licenses
Thermo Scientific Software can be sold as yearly renewable subscriptions. In this case, delivered licenses are time-limited and will expire, usually after one year.
Upon license expiration, each client application will not be able to run anymore.
In order to reactivate these licenses (assuming that the subscription has been renewed), you have to upgrade them to the same version number.
Please perform the following steps:
-
-
- Open a command prompt/terminal in the directory where you have extracted the FlexNet server tools archive and go to the FlexNetLicenseServerTools subdirectory.
- Run ServerFNOODActivation -v to display the licenses currently installed on your machine.
- Copy all fulfillment IDs.
- Your server is connected to the internet:
- Run ServerFNOODActivation -u <FulfillmentID> <SameVersionNumber> for every fulfillment ID.
<SameVersionNumber> contains only major and minor numbers (E.g.,2019.1 not 2019.1.1).
You can request several reactivations at the same time:
ServerFNOODActivation -u <FulfillmentID1> <SameVersionNumber> -u <FulfillmentID2> <SameVersionNumber> -u <FulfillmentID3> <SameVersionNumber>
Your server is not connected to the internet:
- Run ServerFNOODActivation -u <FulfillmentID> <SameVersionNumber> -offline <File.xml>.
<SameVersionNumber> contains only major and minor numbers (E.g.,2019.1 not 2019.1.1).
For example:
ServerFNOODActivation -u 52518253 2019.1 -offline request.xml
If you have several activation codes, you can request several reactivations in the same file:
ServerFNOODActivation -u <FulfillmentID1> <SameVersionNumber> -u <FulfillmentID2> <SameVersionNumber> -u <FulfillmentID3> <SameVersionNumber> -offline <File.xml> - Follow the Generating and importing the response XML file procedure (in section 3.3.2.2).
- Run ServerFNOODActivation -u <FulfillmentID> <SameVersionNumber> for every fulfillment ID.
- Open http://localhost:8090/vendor in a web browser.
- Click on the mcslmd line.
- Click on Reread License Files.
-
Example:
Your organization has purchased a one-year renewable subscription for 10 Amira licenses, version 2019.1.
At the end of the subscription period, the time-limited licenses will expire.
Before they expire, and assuming that you have renewed your subscription, run the ServerFNOODActivation utility for each Amira fulfillment ID, using 2019.1 as the version number.
4.5 Transferring your Licenses
Should you want to transfer some or all of your Thermo Scientific Software licenses onto a different license server, you can deactivate some or all of your activated licenses.
-
-
- Open a command prompt/terminal in the directory where you have extracted the FlexNet server tools archive and go to the FlexNetLicenseServerTools subdirectory.
- Run ServerFNOODActivation -v to display the licenses currently installed on your machine.
- Copy all fulfillment IDs (see figure 2).
- Your server is connected to the internet:
- Run ServerFNOODActivation -r <FulfillmentID> for every fulfillment ID.
You can request several deactivations at the same time:
ServerFNOODActivation -r <FulfillmentID1> -r <FulfillmentID2> -r <FulfillmentID3>
Your server is not connected to the internet:
- Run ServerFNOODActivation -r <FulfillmentID> -offline <File.xml>. For example:
ServerFNOODActivation -r 52518253 -offline request.xml
If you have several activation codes, you can request several deactivations in the same file:
ServerFNOODActivation -r <FulfillmentID1> -r <FulfillmentID2> -r <FulfillmentID3> -offline <File.xml> - Follow the Generating and importing the response XML file procedure (in section 3.3.2.2).
- Run ServerFNOODActivation -r <FulfillmentID> for every fulfillment ID.
- Open http://localhost:8090/vendor in a web browser.
- Click on the mcslmd line.
- Click on Reread License Files.
-
Note: After successful deactivation of some or all of your licenses, you can activate them on a different license server.
To validate the configuration of the new server without preventing the old server from continuing to serve licenses, we suggest that you first transfer only one license or token, then when the new server is up, transfer the rest of the licenses/tokens.
4.6 Deprecated FlexNet Licenses Administration Tools
The previous license administration executables have been deprecated and have been replaced by the ServerFNOODActivation executable:
ActivateServer
Call ServerFNOODActivation with the -a option instead.
ReturnServerActivation
Call ServerFNOODActivation with the -r option instead.
UpgradeServerActivation
Call ServerFNOODActivation with the -u option instead.
ViewServerActivationStatus
Call ServerFNOODActivation with the -v option instead.
5 Additional License Control / Borrowing
5.1 Nomad Licensing / Borrowing
To use our products on a system that is not always connected to the license server,
you will need to borrow a license while you are connected to the server, then disconnect
from the server. This kind of licensing is what we call nomad licensing.
You can use the license even when your machine is disconnected from the network where the FlexNet server is located.
However, borrowing a license decreases the number of available licenses on the network.
Detailed instructions are given below. We will assume that standard FlexNet licensing, i.e., not borrowing, is already working correctly.
-
-
- On the client machine, in a command prompt/terminal, use the cd command to go to the directory where the FlexNet utilities are installed.
By default, these utilities are found on the client machine in:
<install_dir>/share/license/FLEXnet - To initiate borrowing, execute the lmutil program on the client as follows:
lmutil lmborrow mcslmd <enddate> <time>
where:
<enddate> Enddate is the date the license is to be returned in dd-mmm-yyyy format.
<time> Time is optional and is specified in 24-hour format (hh:mm) in the FlexEnabled application’s local time.
If time is unspecified, the checkout lasts until the end of the given end date.
For example:lmutil lmborrow mcslmd 16-jan-2007 13:00
- Start the product, then use all of the extensions that you want to borrow.
- Disconnect from the network.
- Exit the product and confirm that you can restart it and use all of the borrowed extensions.
- On the client machine, in a command prompt/terminal, use the cd command to go to the directory where the FlexNet utilities are installed.
-
To print information about borrowed features, issue the following command on the machine that borrowed the features:
lmutil lmborrow -status
Note: For more information, please refer to FlexNet Publisher – License Administration Guide chapter 7, section “License Borrowing with BORROW“.
5.2 Additional License Controls
Additional controls on floating licenses can be specified in an options file.
This can be done, for instance, by creating an mcslmd.opt options file in the same directory as your license file (i.e., <lmadmin install directory>/licenses/mcslmd)
The most important operating parameters are:
-
-
-
- Limit the number of tokens that can be borrowed:
Example: The customer wants to reserve 60 tokens out of 100 total tokens. That leaves 40 tokens available to be borrowed.
Add a BORROW_LOWWATER line:
BORROW_LOWWATER <Product Name> 60 - Limit the number of days a token can be borrowed:
Example: One week (7 days x 24 hours = 168 hours).
Add a MAX_BORROW_HOURS line:
MAX_BORROW_HOURS <Product Name> 168 - Specify who is allowed to borrow:
- a user
INCLUDE_BORROW <Product Name> USER Jim - a group of users
INCLUDE_BORROW <Product Name> GROUP project_dev - a computer
INCLUDE_BORROW <Product Name> HOST host_name - a group of computers
INCLUDE_BORROW <Product Name> HOST_GROUP computer_group
- a user
- Specify who is not allowed to borrow:
- a user
EXCLUDE_BORROW <Product Name> USER Jim - a group of users
EXCLUDE_BORROW <Product Name> GROUP project_dev - a computer
EXCLUDE_BORROW <Product Name> HOST host_name - a group of computers
EXCLUDE_BORROW <Product Name> HOST_GROUP computer_group
- a user
- Defining groups:
- Group of users:
GROUP project_dev Jim Mike Bob - Group of computers:
HOST_GROUP computer_group host1 host2 host3
- Group of users:
- Reserving tokens:
Tokens can be reserved for specific users groups or computers.- Reserve 10 tokens for a user:
RESERVE 10 <Product Name> USER Jim - Reserve 10 tokens for a group of users:
RESERVE 10 <Product Name> GROUP project_dev - Reserve 10 tokens for a computer:
RESERVE 10 <Product Name> HOST host1 - Reserve 10 tokens for a group of computers:
RESERVE 10 <Product Name> HOST_GROUP computer_group
- Reserve 10 tokens for a user:
- Setting access permissions:
You can control who is allowed to use a product using the INCLUDE / EXCLUDE commands.- Who is allowed to use a product:
INCLUDE <Product Name> USER Jim
Can be used for GROUP, HOST and HOST_GROUP as described above. - Who is not allowed to use a product:
EXCLUDE <Product Name> USER Mike
- Who is allowed to use a product:
- Limit the number of tokens that can be borrowed:
-
-
To validate these new options, you must perform the following actions:
-
-
- Open http://localhost:8090/vendor in a web browser.
- Click on the mcslmd line.
- Click on Reread License Files.
-
Note: For more information, please refer to FlexNet Publisher – License Administration Guide chapter 13, section “Managing the Options File“.
6 Upgrading the FlexNet License Server
When a new version of the Thermo Scientific FlexNet tools is released, you will need to update your FlexNet license server:
-
-
- Stop lmadmin service.
- Open http://localhost:8090/systeminfo in a web browser.
- In the Server Configuration tab, click on the Stop Server button.
- Open a command prompt/terminal in the directory where you have extracted the FlexNet server tools archive and go to the FlexNetLicenseServerTools subdirectory.
- Enter the following command with administrator rights:
- For Windows: installanchorservice mcslmd mcslmd-applications
- For Linux and Mac OS X: install_fnp.sh
- Launch lmadmin installer.
- For Windows:
- Perform all the steps with default values, confirming that the existing installation will be overwritten.
- In Service Configuration page check the box Run as a service and perform all remaining steps with default values.
- Check if lmadmin service is started: open Windows Task Manager and look for the service lmadmin in the Services tab. If the service is stopped, start it.
- For Linux:
- Perform all the steps with default values, confirming that the existing installation will be overwritten.
- Open a terminal and start the server with the command: <lmadmin install directory>/lmadmin (By default: /opt/FNPLicenseServerManager/lmadmin).
- For Mac OS X:
- Perform all the steps with default values, confirming that the existing installation will be overwritten.
- Open a terminal and start the server with the command: /Library/StartupItems/LMadmin start
- For Windows:
- Copy/paste the mcslmd and mcslmd_libFNP files from FlexNetLicenseServerTools directory to the lmadmin install directory.
- Import licenses.
- Open http://localhost:8090/systeminfo in a web browser.
- In the Vendor Daemon Configuration tab, click on the Import License button.
- Select the license.dat file created for the previous installation.
- Check Overwrite License File on License Server and click on Import License.
- If mcslmd fails to start, please refer to FAQ – mcslmd Vendor Daemon Startup Troubleshooting Suggestions.
- Stop lmadmin service.
-
7 Firewall
You need to configure your firewall to allow the connection to the online activation server:
-
-
- Server: vsg3d.flexnetoperations.com
- IP: 64.14.29.85
- Port: 443 (https)
-
and to allow the connection to the ports used by lmadmin and lmgrd (a port is dedicated to client/server communications and another one to mcslmd/server communications).
8 Troubleshooting
If you encounter technical problems with the installation and management of your FlexNet licensing server, please refer to the associated FAQ section.
For additional information, please refer to the FlexNet documentation.
The FlexNet Publisher – License Administration Guide contains a troubleshooting appendix.
If you need assistance getting your FlexNet licenses installed and operational, please contact our customer support group.