Linux – lmadmin manual installation
1. System Requirements for lmadmin
The supported Linux platforms for installing a FlexNet license server and using the Thermo Scientific FlexNet tools for license administration are the following (see FlexNet Release notes section “System Requirements for lmadmin”) :
- Linux x86-64 ( 64-bit) server tested platforms:
- Red Hat Enterprise Linux 8 and 9
- SUSE Linux Enterprise 15 SP3, 15SP4
- Ubuntu 20.4
The lmadmin installer requires that JRE or OpenJDK 1.6 or later (for OS X: JRE or OpenJDK 1.7 or later) is installed. If the JRE/ OpenJDK is not already present on the machine, it must be installed separately, because it is not bundled with the lmadmin installer. Download links for the JRE can be found on java download page. Download links for OpenJDK versions can be found on OpenJDK download page.
Do not run the 32-bit lmadmin and the 64-bit lmadmin on the same system. If you are upgrading from the 32-bit lmadmin to the 64-bit version, you must stop and uninstall the 32-bit lmadmin first.
2. Supported Browsers for lmadmin
lmadmin is tested on the following Web browsers:
• Red Hat Linux—Mozilla Firefox 46.x, Google Chrome 106.x
3. Download License Server Installer
To use Thermo Scientific Software, you must have installed version 11.16.6 or higher of the FlexNet tools on your system. You can download the last version of those tools via the following links.
Linux:
4. Install lmadmin as License server manager – Linux installation
Warning:
- To install lmadmin, you must run the following steps as a non-root user with root privileges (do not use root user).
- Before starting the installation, make sure Linux Standard Base (LSB) library is installed:
- For Ubuntu:
- sudo apt-get install lsb-core
- For Redhat/CentOS:
- sudo yum install redhat-lsb-core
- Open a Terminal window.
- Install lmadmin from directory FlexNetLmadminInstaller where you have extracted the FlexNet server tools archive:
- Run the command:
- sudo ./flexnet-asglmd_mcslmd-server_11.19.4.1_linux-x64-gcc48/FlexNetLmadminInstaller/lmadmin-x64_lsb-11_19_4_1.bin
- If you get an error message about missing libraries, please refer to System Requirements for lmadmin
- By default, the lmadmin install directory is: /opt/FNPLicenseServerManager
- Perform all steps with default values and finish.
- Launch the command:
- sudo chown -R <YourUserName> /opt/FNPLicenseServerManager
- Add the current directory to your library path by entering the following command:
- Linux bash:
- export LD_LIBRARY_PATH=/opt/FNPLicenseServerManager/:$LD_LIBRARY_PATH
- Linux csh:
- setenv LD_LIBRARY_PATH /opt/FNPLicenseServerManager/
- Start the server with the command:
- /opt/FNPLicenseServerManager/lmadmin
- Check that the server has started:
- Open http://localhost:8090/ in a web browser to access its web user interface.
- The process lmadmin should be displayed by the command:
- ps -fC lmadmin
Note: For more information on lmadmin, please refer to FlexNet Publisher – License Administration Guide , section lmadmin License Server Manager.
Note: Installing lmadmin will temporarily stop the current FlexNet Publisher service (if already started).
5. Setup FlexNet server for Thermo Scientific License
5.1 Prerequisites
- Make sure you’ve run all the steps described above in this guide.
- Open a command prompt/terminal with administrator’s rights in the directory where you have extracted the FlexNet server tools archive and go to the FlexNetLicenseServerTools subdirectory.
- Enter the following command in the console to install Thermo Scientific anchor services:
- In a terminal with administrator’s rights type the following command:
- sh install_fnp.sh
- Add the current directory to your library path by entering the following command where <PathToFlexNetLicenseServerToolsDirectory> must be replaced by the explicit path to the FlexNetLicenseServerTools directory:
- Linux bash:
- export LD_LIBRARY_PATH=<PathToFlexNetLicenseServerToolsDirectory>:$LD_LIBRARY_PATH
-
- Linux csh:
- setenv LD_LIBRARY_PATH <PathToFlexNetLicenseServerToolsDirectory>
- Please check that the folder /usr/local has write permission for activating, deactivating, and upgrading licenses.
5.2 Adding the asglmd Vendor Daemon to lmadmin
You can skip this section if your server must provide licenses for OpenInventor products only, and directly go to Adding the mcslmd Vendor Daemon to lmadmin section.
- Make sure that process (service) asglmd is not running. If necessary, please stop it. To check it:
- For Linux:
- Open a Terminal, and run:
- ps -fC asglmd
- If asglmd is displayed:
- pkill asglmd
- For Linux:
- Copy/paste the asglmd and asglmd_libFNP files from the downloaded package FlexNetLicenseServerTools directory to the lmadmin install directory. By default, the lmadmin install directory is:
- /opt/FNPLicenseServerManager on Linux.
- If you have just installed lmadmin, please check that the lmadmin service is running:
- For Linux open a Terminal, and run:
- ps -fC lmadmin
- If lmadmin is not running, start it using the command:
- /opt/FNPLicenseServerManager/lmadmin
- If lmadmin cannot be run, please refer to section Install lmadmin as license server manager.
- Open http://localhost:8090/systeminfo in a web browser.
- If you have just installed lmadmin, you will be prompted to enter a name and a password: enter “admin” and “admin”.
- Retrieve and copy the Ethernet Address. If Ethernet Address is not displayed, you can use the Volume Serial Number.

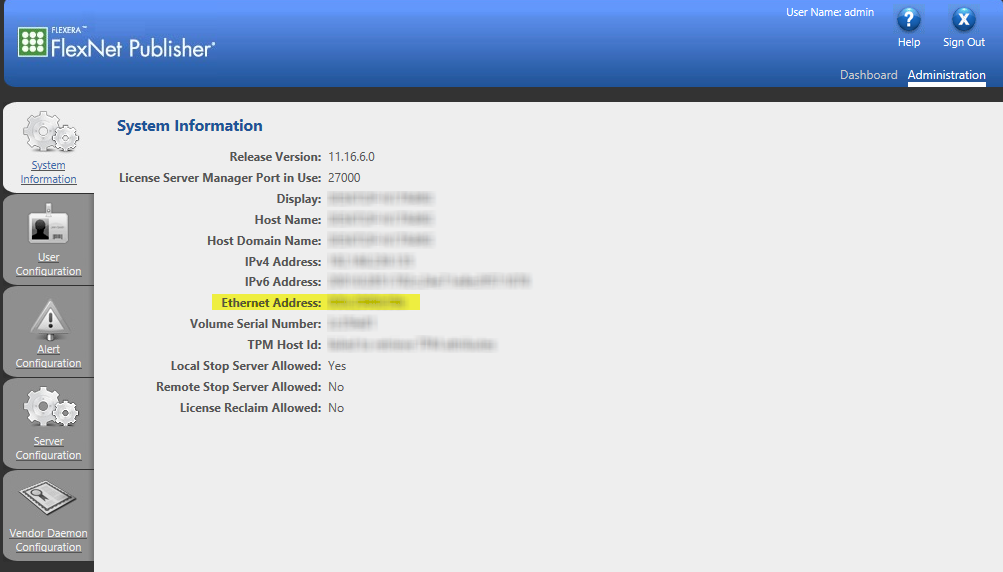
lmadmin – Retrieve and copy the Ethernet Address
- Create a temporary text-only file (at any location in your file system) named license.dat containing:
SERVER this_host <EthernetAddress>
VENDOR asglmd
For instance:
SERVER this_host 012345678901
VENDOR asglmd - Open http://localhost:8090/vendor in a web browser, to set up your license server as follows:
- Click on Import License.
- Select your previously created license.dat file.
- Check Overwrite License File on License Server.
- Click on Import License.
- Check in http://localhost:8090/vendor that asglmd vendor daemon has been installed. The vendor daemon won’t start and will be in “Down” status until a valid license is activated for that vendor daemon.
- If asglmd fails to start, please refer to FAQ – Vendor Daemon Startup Troubleshooting Suggestions.
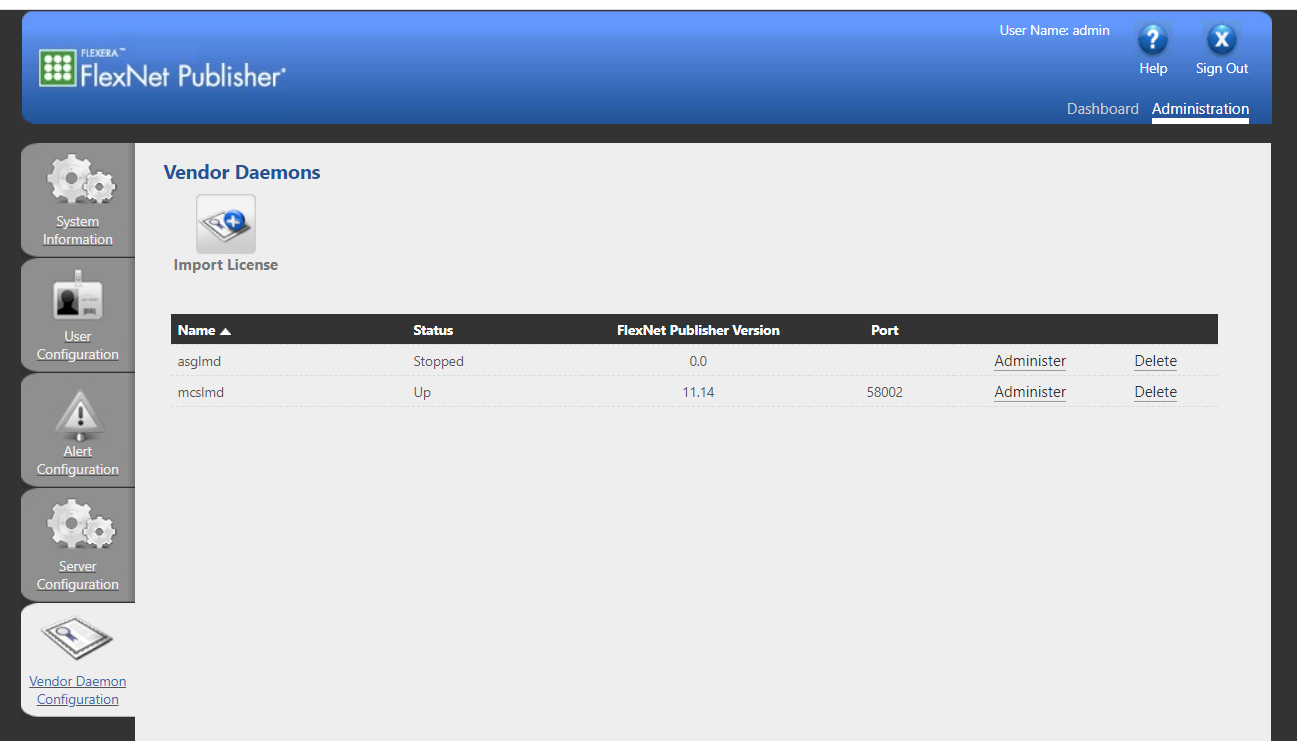
lmadmin Administration page shows installed vendor daemons
5.3. Adding the mcslmd Vendor Daemon to lmadmin
You can skip this section if your server must NOT provide licenses for Avizo, Amira or PerGeos products released before 2020.3 version, or for OpenInventor products.
- Make sure that process (service) mcslmd is not running. If necessary, please stop it. To check it:
- For Linux:
- Open a Terminal, and run:
- ps -fC mcslmd
- If mcslmd is displayed:
- pkill mcslmd
- For Linux:
- Copy/paste the mcslmd and mcslmd_libFNP files from the downloaded package FlexNetLicenseServerTools directory to the lmadmin install directory. By default, the lmadmin install directory is:
- /opt/FNPLicenseServerManager on Linux.
- If you have just installed lmadmin, please check that the lmadmin service is running:
- For Linux open a Terminal, and run:
- ps -fC lmadmin
- If lmadmin is not running, start it using the command:
- /opt/FNPLicenseServerManager/lmadmin
- If lmadmin cannot be run, please refer to section Install lmadmin as license server manager.
- Open http://localhost:8090/systeminfo in a web browser.
- If you have just installed lmadmin, you will be prompted to enter a name and a password: enter “admin” and “admin”.
- Retrieve and copy the Ethernet Address. If Ethernet Address is not displayed, you can use the Volume Serial Number.
lmadmin – Retrieve and copy the Ethernet Address
-
- Create a temporary text-only file (at any location in your file system) named license.dat containing:
SERVER this_host <EthernetAddress>
VENDOR mcslmd
For instance:
SERVER this_host 012345678901
VENDOR mcslmd - Open http://localhost:8090/vendor in a web browser, to set up your license server as follows:
- Click on Import License.
- Select your previously created license.dat file.
- Check Overwrite License File on License Server.
- Click on Import License.
- Check that mcslmd vendor has started:
- Check the activation status of your licenses (if no license is active on your server the mcslmd daemon will exit immediately after starting):
- Open a command prompt/terminal in the directory where you extracted the FlexNet server tools archive and go to the FlexNetLicenseServerTools subdirectory
- Run ServerFNOODActivation -view
- Check the output, making sure the Status of each license is Enabled, and the Trust Flags are Fully Trusted. If they are not, please contact our customer support group for assistance.
- If no license is active, please activate your licenses following the instructions in section Activate Thermo Scientific Software Licenses
- check on http://localhost:8090/vendor web page that mcslmd status is Up.
- If mcslmd fails to start, please refer to FAQ – Vendor Daemon Startup Troubleshooting Suggestions.
- Check the activation status of your licenses (if no license is active on your server the mcslmd daemon will exit immediately after starting):
- Create a temporary text-only file (at any location in your file system) named license.dat containing:
Congratulations! The server is now running and the Thermo Scientific vendor daemons are set up and ready for license installation.
6. Licenses administration
Once lmadmin installation is complete and the FlexNet server is up and running, please refer to Licenses Administration section of FlexNet License Server For Thermo Scientific Software Applications Installation, Configuration, And Administration Guide documentation to install licenses on the server.
7. Upgrade the FlexNet License Server
When a new version of the Thermo Scientific FlexNet tools is released, you will need to update your FlexNet license server.
Before upgrading, stop lmadmin service:
-
-
- Open http://localhost:8090/systeminfo in a web browser.
- In the Server Configuration tab, click on the Stop Server button.
-
Do not run the 32-bit lmadmin and the 64-bit lmadmin on the same system. If you are upgrading from the 32-bit lmadmin to the 64-bit version, you must stop and uninstall the 32-bit lmadmin first.
Follow the installation and configuration procedure described above in the above section Install lmadmin as License server manager , then run the “import licenses” steps described below:
-
-
- Open http://localhost:8090/systeminfo in a web browser.
- In the Vendor Daemon Configuration tab, click on the Import License button.
- Select the license.dat file created for the previous installation.
- Check Overwrite License File on License Server and click on Import License.
- If the vendor daemon (asglmd/mcslmd) fails to start, please refer to FAQ – mcslmd Vendor Daemon Startup Troubleshooting Suggestions.
-