FAQ
How to Use lmgrd as an Alternative of lmadmin
How to Install lmadmin manually on Windows as an Alternative of Thermo Scientific License Manager for Server installation
How to Change the Vendor Daemon Port with lmadmin
How to Manage Redundant FlexNet License Servers
How to Install a FlexNet License Server on a Virtualized Machine
Slow Server Startup TroubleShooting Suggestions
Vendor Daemon Startup Troubleshooting Suggestions
How to Display Features In Use using Lmutil
Back to FlexNet License Server For Thermo Scientific Software Applications Installation, Configuration, And Administration Guide Server main page.
How to Use lmgrd as an Alternative of lmadmin
1 Prerequisite
To use Thermo Scientific Software, you must have installed version 11.16.6 or higher of the FlexNet tools on your system. You can download the last version of those tools via the following links.
Windows:
Linux:
Note: Your licenses must be installed before starting the server.
To manage the licenses of a Thermo Scientific software product, please refer to the documentation “FlexNet License Server For Thermo Scientific Software Applications Installation, Configuration, And Administration Guide” at “Administrating your licenses“.
2 Information Required for Creating the License Server File
In order to generate a FlexNet server license file, you need to get the following information about the system the license server will be running on:
- Host ID (i.e., Ethernet address)
- Hostname (or IP address)
Instructions for capturing this information are given below for Linux and Windows.
2.1 Linux
Warning: To install lmadmin, the administrators rights are required, (non-root user).
- On the system the FlexNet server is running on,
open a command shell, go to the directory where the server will be
installed:cd <server_install_dir>/FlexNetLicenseServerTools
- To get the host ID (i.e., Ethernet address), execute the lmhostid program as follows:
./lmutil lmhostid
The output will look like:
lmhostid - Copyright (c) 1989-2013 Flexera Software LLC. All Rights Reserved.
    The FlexNet host ID of this machine is "012345678901"
    Only use ONE from the list of hostids.
If the command fails with error: No such file or directory. You need install as root the LSB (Linux Standard Basic) libraries.
- To get the hostname, you can use the following command:
./lmutil lmhostid -hostname
- To get the IP address (optional):
./lmutil lmhostid -internet -v4
- Save the lmhostid output and the hostname (or IP address) for the creation of the server license file.
2.2 Windows
- On the system where the FlexNet server is running/will run, run LMTOOLS. It should be located in:
<server_install_dir>\FlexNetLicenseServerTools\lmtools.exe
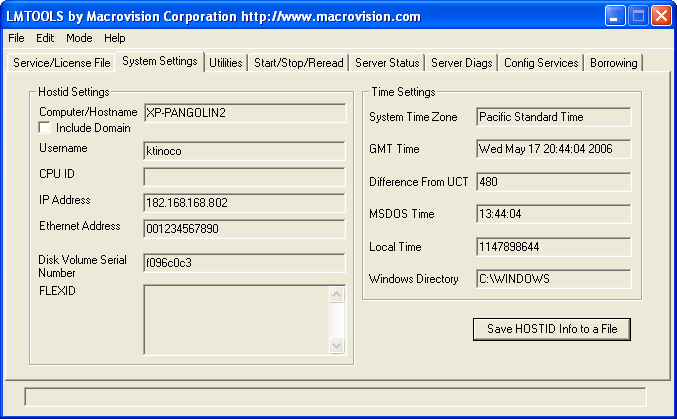
- Click on the System Settings tab.
- The Computer/Hostname field contains the required hostname.
- The Ethernet address field contains the required host ID.
- The IP Address field contains the optional IP address.
- Save the lmhostid output and the hostname (or IP address) for the creation of the server license file.
3 Installing the FlexNet Server
Create the server license file in:
<server_install_dir>/FlexNetLicenseServerTools/passwordServer.dat
Enter your information:
    SERVER <hostName> <hostId> [<portNumber>]
    VENDOR <vendor name> [port=<vendor portNumber>]
Example:
    SERVER BOD1060 0024e83de91e
    VENDOR asglmd
Note: If you have several Ethernet addresses, use the first one.
3.1 Linux
At this point, we assume that the FlexNet files are installed in the default location:
cd <server_install_dir>/FlexNetLicenseServerTools/
The vendor daemon (asglmd or mcslmd) must be in the same directory as lmgrd.
The command to start the server looks like:
./lmgrd -c <server_license_file> -l [+]<debug_log_path>
where:
-
-
-
-
- <server_license_file> is the full path to the server license file.
- <debug_log_path> is the path to the debug log file.
-
-
-
Prepending the + character to the log file name causes log entries to be appended.
The following is the suggested command to use:
./lmgrd -c passwordServer.dat -l +flexnet.log
Note: Any time you make a change to the server licenses, you should use the above command. If the operation fails the first time you enter it, wait a few seconds and retry.
Tip: It can be convenient to set up the server so that it is started automatically upon system reboot. This would involve editing the system boot script.
For information about how to start lmgrd automatically under UNIX (Linux), please refer to FlexNet Publisher – License Administration Guide chapter – “License Server Manager “lmgrd”“.
3.2 Windows
At this point, we assume that the FlexNet files are installed in the default location:
<server_install_dir>/FlexNetLicenseServerTools/
FlexNet uses a program called lmgrd to manage licenses. On Windows, FlexNet provides an advanced tool called LMTOOLS that allows one to configure lmgrd to run as a service. This is the preferred method of configuring FlexNet and is outlined below.
Note: To configure a license server as a service, you must have Administrator privileges.
The vendor daemon (asglmd.exe or mcslmd.exe) must be in the same directory as lmgrd.exe.
- Run LMTOOLS.
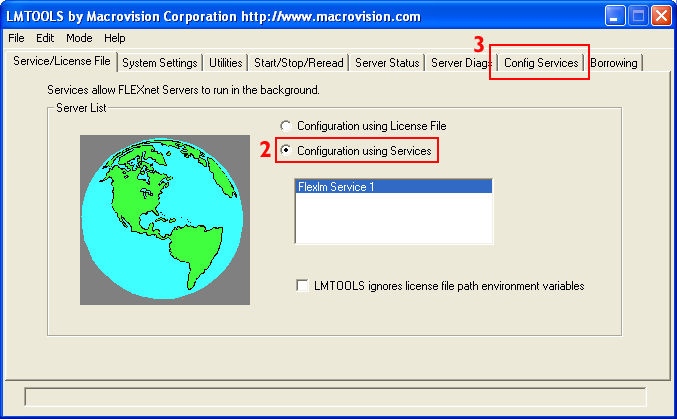
- Click the Configuration using Services radio button to select it.
- Click the Config Services tab.
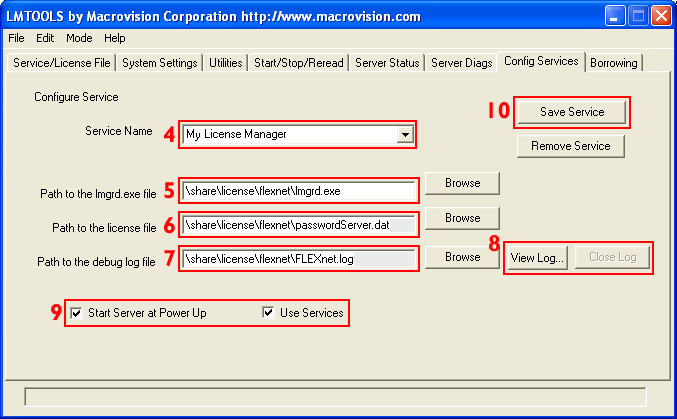
- In the Service Name field, type the name of the service that you want to define. It is recommended that you use the name Thermo Scientific Applications License Manager.
- In the Path to the lmgrd.exe file field, enter or browse to lmgrd.exe for this license server. In many cases the path will be:
<server_install_dir>\FlexNetLicenseServerTools\lmgrd.exe
- In the Path to the license file field, enter or browse to the license file for this license server. It is recommended that you copy the server license file to:
<server_install_dir>\FlexNetLicenseServerTools\passwordServer.dat
- In the Path to the debug log file, enter or browse to the debug log file that this license server writes. For example, FlexNet.log.(Prepending the debug log file name with the + character appends logging entries. The default location for the debug log file is the C:\WINDOWS\System32 folder. To specify a different location, make sure you specify a fully qualified path.) For most users, the following should be appropriate:
<server_install_dir>\FlexNetLicenseServerTools\flexnet.log
- (Optional) Click on the View Log button to display the log file. Check that no logging errors occur (i.e., log file can be opened and it contains readable text). Click on the Close Log button to close the log file.
- To ensure that the license service is always running and automatically started upon system reboot, it is necessary to set the two checkboxes, Use Services and Start Server at Power Up, at the bottom of the dialog.
- To save the new Thermo Scientific Applications License Manager service, click the Save Service button.
4 Starting the Server (Windows)
Once the license manager service is configured, lmgrd is started by starting the service from the LMTOOLS interface:
- Run LMTOOLS if it is not already running. LMTOOLS appears with Service/license file tab open.
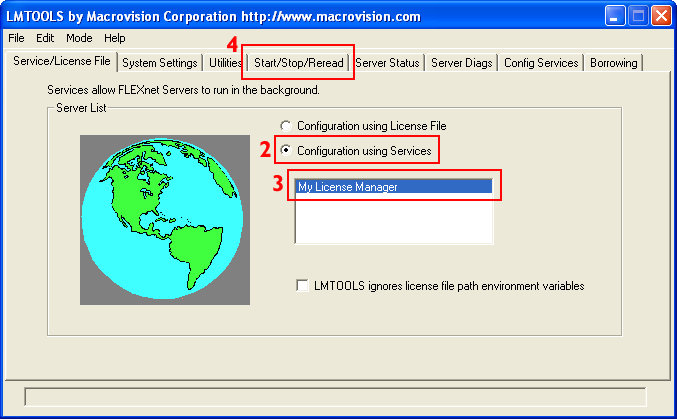
- Click the Configuration using Services radio button.
- Select the service name from the list presented in the selection box. Look for the Thermo Scientific Applications License Manager service.
If you followed the recommendations above, the service name should be Thermo Scientific Applications License Manager. - Click the Start/Stop/Reread tab.
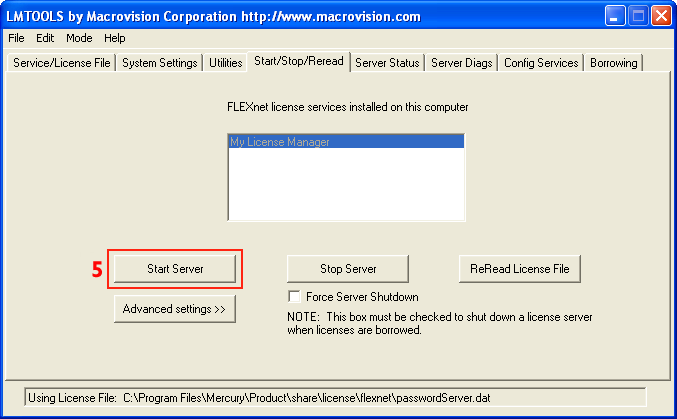
- Start Thermo Scientific Applications License Manager by clicking the Start Server button.
The Thermo Scientific Applications License Manager license server should now be started and writing its debug log output to <server_install_dir>\FlexNetLicenseServerTools\flexnet.log.
Note: Any time you make a change to the server configuration, you should stop the server then restart it in order for the changes to take effect.
Note: Any time you make a change to the server licenses, you should use the Start/Stop/Reread tab, and press the ReReadLicenseFile button. If the operation fails the first time you press it, wait a few seconds and retry.
5 Administrating your Licenses
To manage the licenses of a Thermo Scientific software product, please refer to the documentation “FlexNet License Server For Thermo Scientific Software Applications Installation, Configuration, And Administration Guide” at “Administrating your licenses“.
To reread the license file and start the vendor daemon, use the following command:
./lmgrd lmreread -c <server_license_file> -vendor <vendor_name (asglmd or mcslmd)>
Note: After any change in license server, you must stop the asglmd/mcslmd process, which is reloaded automatically by lmgrd, to take into account the last changes.
Tip: If you encounter any issues with your configuration, please ensure that lmgrd and the vendor daemon are allowed to communicate through the firewall.
How to Install lmadmin manually on Windows as an Alternative of Thermo Scientific License Manager for Server installation
1 System Requirements
The supported Windows platforms for installing a FlexNet license server and using the Thermo Scientific FlexNet tools for license administration are the following (see FlexNet Release notes section “System Requirements for lmadmin”) :
- Windows 10, Windows 11, Windows Server 2019, Windows Server 2022. It is a best practice to run license servers on a server-based OS.
- Thermo Fisher tested on Windows 11 (64-bit)
1.2 Supported Browsers for lmadmin
lmadmin is tested on the following Web browsers: Windows—Microsoft Internet Explorer 11, Microsoft Edge.
1.2 Additional System Requirements for lmadmin
To use lmadmin on Windows platforms, the relevant Microsoft Visual C++ Redistributable Package must be installed. You have an option to install this package during the lmadmin installer process.
The lmadmin installer requires that JRE or OpenJDK 1.6 or later (for OS X: JRE or OpenJDK 1.7 or later) and no higher version than JRE/OpenJDK 15 is installed. If the JRE/ OpenJDK is not already present on the machine, it must be installed separately, because it is not bundled with the lmadmin installer. Download links for the JRE can be found on java download page. Download links for OpenJDK versions can be found on OpenJDK download page.
Do not run the 32-bit lmadmin and the 64-bit lmadmin on the same system. If you are upgrading from the 32-bit lmadmin to the 64-bit version, you must stop and uninstall the 32-bit lmadmin first.
2. Download License Server Installer
To use Thermo Scientific Software, you must have installed version 11.16.6 or higher of the FlexNet tools on your system. You can download the last version of those tools via the following link:
FlexNet tools 11.19.4.1 for Windows 64-bit
3. Install lmadmin as License server manager
Warning: To install lmadmin, the administrator’s rights are required.
Note: Installing lmadmin will temporarily stop the current FlexNet Publisher service (if already started).
Installation on Windows
- Go to the directory where you have extracted the FlexNet server tools archive and run lmadmin installer: flexnet-asglmd_mcslmd-server_11.19.4.1_windows-x64-msvc12u4/FlexNetLmadminInstaller/lmadmin-x64_n6-11_19_4_1.exe
- The default install directory is C:\Program Files\FlexNet Publisher 64-bit License Server Manager. You can modify it but make sure to have rights to write in it.
- You can import settings from a previously installed server and vendor daemon and you can check your settings before proceeding with the installation
- You must check Install Visual C++ 2013 Redistributable Package and agree to its license terms and condition to proceed.
- If you already have it installed on your system, you may see an error message indicating that a newer version of Microsoft Visual C++ Redistributable has been detected on the machine. You can ignore this error message and continue to the next step.
- You can set the IP port number for lmadmin web interface and choose the port number for the license server as well as other settings of the “FlexNet Publisher® web user interface” (do not alter default values if you are not at ease with them, and write them down before modifying them).
- Continue until the Service Configuration page, where you must check the box Run as a service. Perform all remaining steps with default values.
- Check that the server has started:
- Open Windows Task Manager and look for the service lmadmin64 in the Services tab. If the service is stopped, start it.
- Open http://localhost:8090/ in a web browser (if you used the default port number, otherwise the port number you’ve set must be used). The dashboard of the license server should be displayed.
4. Setup FlexNet server for Thermo Scientific License
4.1 Prerequisites
- Make sure you’ve run all the steps described above in this guide.
- Open a command prompt/terminal with administrator’s rights in the directory where you have extracted the FlexNet server tools archive and go to the FlexNetLicenseServerTools subdirectory.
- Enter the following command in the console to install Thermo Scientific anchor services:
installanchorservice asglmd asglmd-applications
Some antivirus may ask you the permission to execute the installanchorservice (see fig. 2). Check in the console that the installation of the vendor daemon has succeeded (see fig. 3).

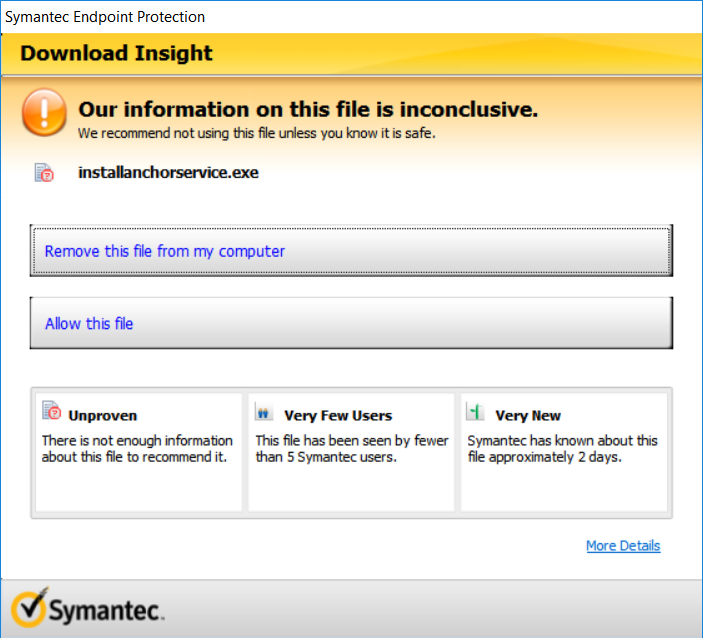
Figure 2 – Allow execution of installanchorservice.exe


Figure 3 – check installation is successful
The relevant Microsoft Visual C++ Redistributable Package must be installed. For the required minimum version, refer to the FlexNet Release notes, section “System Requirements for lmadmin”. You could have optionally installed this requirement during the lmadmin installer process, see chapter Install lmadmin as License server manager. Otherwise you can download and install these requirements here:
- Windows 32-bit (click on Download then select vcredist_x86.exe )
- Windows 64-bit (click on Download then select vcredist_x64.exe )
4.2 Adding the asglmd Vendor Daemon to lmadmin
- Make sure that process (service) asglmd is not running. If necessary, please stop it. To check it:
- Open the Windows Task Manager and look in the Details tab.
- Stop asglmd. Right click on asglmd and stop it.
- Copy/paste the asglmd and asglmd_libFNP files from the downloaded package FlexNetLicenseServerTools directory to the lmadmin install directory. By default, the lmadmin install directory is:
- C:\Program Files\FlexNet Publisher 64-bit License Server Manager.
- If you have just installed lmadmin, please check that the lmadmin service is running:
- Open the Windows Task Manager and select the Services tab.If lmadmin is not running, run lmadmin.exe (by default C:\Program Files\FlexNet Publisher 64-bit License Server Manager).
- Open http://localhost:8090/systeminfo in a web browser.
- If you have just installed lmadmin, you will be prompted to enter a name and a password: enter “admin” and “admin”.
- Retrieve and copy the Ethernet Address. If Ethernet Address is not displayed, you can use the Volume Serial Number.

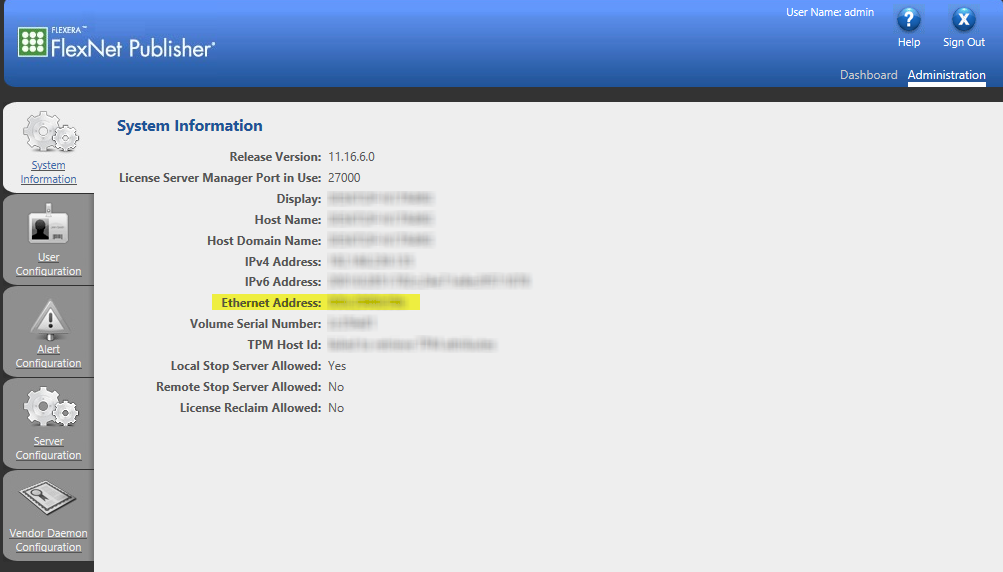
Figure 4 – lmadmin – Retrieve and copy the Ethernet Address
- Create a temporary text-only file (at any location in your file system) named license.dat containing:
SERVER this_host <EthernetAddress>
VENDOR asglmd
For instance:
SERVER this_host 012345678901
VENDOR asglmd - Open http://localhost:8090/vendor in a web browser, to set up your license server as follows:
- Click on Import License.
- Select your previously created license.dat file.
- Check Overwrite License File on License Server.
- Click on Import License.
- Check in http://localhost:8090/vendor that asglmd vendor daemon has been installed. The vendor daemon won’t start and will be in “Down” status until a valid license is activated for that vendor daemon.
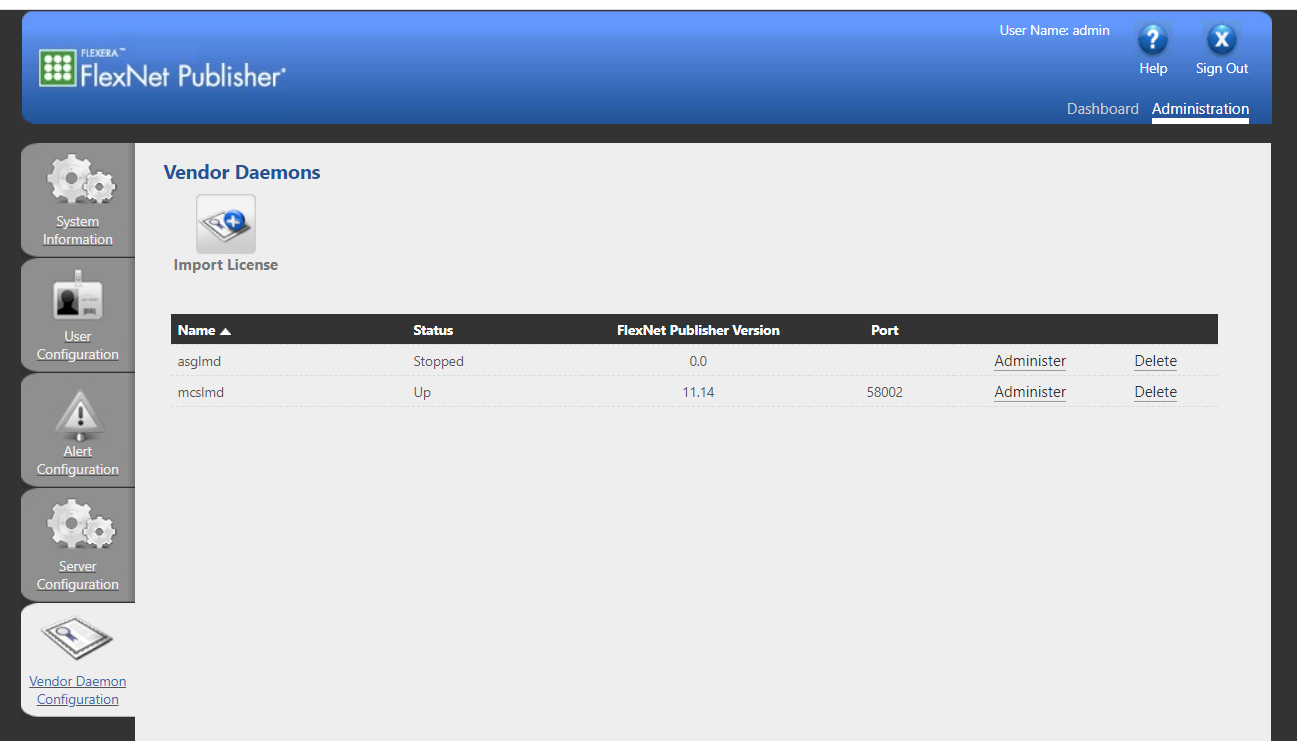
Figure 5 – lmadmin Administration page shows installed vendor daemons
4.3 Adding the mcslmd Vendor Daemon to lmadmin
You can skip this section if your server must NOT provide licenses for Avizo, Amira or PerGeos products released before 2020.3 version.
- Make sure you’ve run all the steps described above in this guide.
- Open a command prompt/terminal with administrator’s rights in the directory where you have extracted the FlexNet server tools archive and go to the FlexNetLicenseServerTools subdirectory.
- Enter the following command in the console to install Thermo Scientific anchor services:
installanchorservice mcslmd mcslmd-applications
- Make sure that process mcslmd is not running. To check it:
- Open the Windows Task Manager and look in the Details tabs.
- Stop mcslmd. Right click on mcslmd and stop it.
- Copy/paste the mcslmd and mcslmd_libFNP files from the downloaded package FlexNetLicenseServerTools directory to the lmadmin install directory. By default, the lmadmin install directory is:
- C:\Program Files\FlexNet Publisher 64-bit License Server Manager.
- If you have just installed lmadmin, please check that the lmadmin service is running:
- Open the Windows Task Manager and select the Services tab. If lmadmin is not running, run lmadmin.exe (by default C:\Program Files\FlexNet Publisher 64-bit License Server Manager)
- Open http://localhost:8090/systeminfo in a web browser.
- If you have just installed lmadmin, you will be prompted to enter a name and a password: enter “admin” and “admin”.
- Retrieve and copy the Ethernet Address. If Ethernet Address is not displayed, you can use the Volume Serial Number. See Figure 4 – lmadmin – Retrieve and copy the Ethernet Address
- Create a temporary text-only file (at any location) named license.dat containing:
SERVER this_host <EthernetAddress>
VENDOR mcslmd
For instance:
SERVER this_host 012345678901
VENDOR mcslmd
- Open http://localhost:8090/vendor in a web browser, to set up your license server as follows:
- Click on Import License.
- Select your previously created license.dat file.
- Check Overwrite License File on License Server.
- Click on Import License.
- Check that mcslmd vendor has started:
- Check the activation status of your licenses (if no license is active on your server the mcslmd daemon will exit immediately after starting):
- Open a command prompt/terminal in the directory where you extracted the FlexNet server tools archive and go to the FlexNetLicenseServerTools subdirectory
- Run ServerFNOODActivation -view
- Check the output, making sure the Status of each license is Enabled, and the Trust Flags are Fully Trusted. If they are not, please contact our customer support group for assistance.
- If no license is active, please activate your licenses following the instructions in section Activate Thermo Scientific Software Licenses
- check on http://localhost:8090/vendor web page that mcslmd status is Up.
- If mcslmd fails to start, please refer to FAQ – mcslmd Vendor Daemon Startup Troubleshooting Suggestions.
- Check the activation status of your licenses (if no license is active on your server the mcslmd daemon will exit immediately after starting):
Congratulations! The server is now running and the Thermo Scientific vendor daemons are set up and ready for license installation.
How to Change the Vendor Daemon Port with lmadmin
- Go to http://localhost:8090/vendor.
- Click on the “asglmd” or “mcslmd” line.
- In “General Configuration”, set the “Vendor Daemon Port” with “Use this port:”
- Click on “Save” button
- Click on “Stop” button
- Click on the “asglmd” or “mcslmd” line.
- Click on “Start” button
Note: Make sure the chosen port number is not blocked by a firewall or any internet security programs. Make sure it is not already in use by another application.
How to Manage Redundant FlexNet License Servers
Redundant FlexNet license servers are not supported by the new activation licensing. In such a configuration, the previous licensing mechanism (based on password.dat) must be used instead. Please contact your Thermo Scientific license department.
For more information, please refer to FlexNet Publisher – License Administration Guide chapter ” Ensuring License Availability”.
How to Install a FlexNet License Server on a Virtualized Machine
The installation of a virtualized license server is complicated and limited to a few virtualization platforms (VMware ESX, Microsoft Hyper-V and Citrix XenServer).
For more information, please refer to FlexNet Publisher – License Administration Guide “Trusted Storage – Licensing in Virtual Environments”.
Warning: In some virtual systems such as VMware ESX, licensing activation can fail because only a single Unique Machine Number can be detected.
This issue can happen if the system has no Network Interface Controller. With a NIC interface, additional UMNs would be detected, and activation would succeed.
Slow Server Startup Troubleshooting Suggestions
The slowness of startup are probably due to problems of communications between the Thermo Scientific software client application and the server.
- Check the time elapsed to check out a FlexNet license by the client: on the client machine, add the environment variable VSG_LICENSE_DEBUG. Set VSG_LICENSE_DEBUG to a file name (make sure it is set to a path where you can write files) and start the client application. Licensing debug output will be written to the specified file when the client application is launched.
- Check the configuration of the “DNS search path”.
- Check the route packets trace from the server to client and from the client to server. E.g.: traceroute (Linux/Mac) or tcproute.exe (Windows).
Vendor Daemon Startup Troubleshooting Suggestions
The vendor daemon can fail to start for various reasons. Here are some things to check for.
- Invalid license.dat file:
- Make sure you did not include angle brackets (“<” and “>”) around the hostname and Ethernet address.
- Make sure you provided an Ethernet address as the second field on the SERVER line, not an IP address.
- Check the file carefully for incorrect values, typos and/or syntax errors.
- Make sure the file is a plain text file (e.g., not a Word file, not an RTF file…).
- Software activation errors (only for Avizo, Amira or PerGeos licenses issued before 2020.3 version). To check the activation status of your licenses:
- Open a command prompt/terminal in the directory where you have extracted the FlexNet server tools archive and go to the FlexNetLicenseServerTools
- Run servercomptranutil -v
- Check the output, making sure the Status of each license is Enabled, and the Trust Flags are Fully Trusted. If they are not, please contact our customer support group for assistance.
- If no activations are available, please activate your licenses by following the instructions in section Adding (New) Licenses.
- vendor daemon files not copied to the lmadmin directory. Please make sure that the vendor daemon files (asglmd and asglmd_libFNP files / mcslmd and mcslmd_libFNP files) have been copied from the downloaded package FlexNetLicenseServerTools directory to the lmadmin install directory. By default, the lmadmin install directory is:
- C:\Program Files\FlexNet Publisher 64-bit License Server Manager on Windows.
- /opt/FNPLicenseServerManager on Linux.
- /Applications/FNPLicenseServerManager on Mac OS X.
- On Windows, the vendor daemon can fail to start if there is a permission issue with the FlexNet Licensing Service. To apply the required permission to FlexNet Licensing Service, please follow those steps:
- Download installs.exe
- Open a command prompt with administrator rights in the directory where you have downloaded installs tool and enter this command : installs.exe -a lmadmin
- The server firewall must be configured to allow communication between lmadmin/lmgrd and the vendor daemon. We suggest that you configure lmadmin/lmgrd to use a static port for communicating with asglmd/mcslmd vendor daemon and to open this port on the server firewall. For information on configuring the lmadmin port, see How to Change the Vendor Daemon Port with lmadmin.
How to Display Features In Use using Lmutil
Due to a FlexNet limitation, for certain types of licenses, the License Server Dashboard does not display all the available Features in the Concurrent panel. Note that this issue only affects Avizo XInline extensions licenses.
In order to workaround this issue, here are the steps to follow :
- Open a command prompt/terminal in the directory where you have extracted the FlexNet server tools archive and go to the FlexNetLicenseServerTools subdirectory.
- Run Lmutil lmstat -f
- The feature usage info displays all the licenses issued and all the licenses in use on the license server